In the previous parts of this guide, we’ve covered mistakes at the campaign and the ad group level, as well as mistakes at the ad and the keyword level.
But that’s not all—in the last part of the guide, we are highlighting mistakes in PPC campaign management and analytics. Keep on reading to know more!
Part 1. Mistakes at the Campaign Level
Part 2. Mistakes at the Ad Group Level
Part 3. Mistakes at the Ad Level
Part 4. Mistakes at the Keyword Level
Part 5. Google Ads Campaign Management Mistakes
1. Combining your Display and Search campaigns
2. Not Using the Proper Exclusions for Display Ads
3. Ignoring Your Placement Reports
4. Not Setting up Device Bid Adjustments
5. Not Setting up Local Bid Adjustments
6. Over-Engineered Bid Structures
8. Not Testing the Optimal Ad Position (It’s Not Always the #1)
9. Not shifting from manual to Smart Bidding
Part 6. Google Ads Analytics Mistakes
11. Not segmenting your reports
12. Focusing only on aggregate campaign data
13. Not Considering your customer Lifetime Value (CLV)
Part 5. Google Ads Campaign Management Mistakes
1. Combining your Display and Search campaigns
Let’s say you’ve run a Search campaign, but you find your ads appearing on Google Display Network (GDN); as a result, the campaign is underperforming.
How to handle the issue: Keep your Display and Search campaigns separate. If you are on a tight budget, likely you don’t need a Display campaign.
When you are creating an ad campaign, Google automatically puts your search campaigns into the GDN to expand reach.
However, it’s ineffective to deliver the same messages on both networks. Users on Search have a much deeper buyer intent than people who are just browsing random websites. At the same time, Display Network is mostly a good choice, if you want to expand your reach and have enough budget for this.
 Uncheck the checkbox to exclude ad shows on GDN
2. Not using the proper exclusions for Display ads
Let’s say you are selling kitchen furniture, but your Display ads are shown in kids’ cartoons and games; this leads to budget loss.
How to handle the issue: Exclude websites, apps, or videos related to specific irrelevant or inappropriate categories.
How to exclude a specific topic
Select the Display campaign you want to edit. Click “Topics” and choose the Exclusions tab, and then click the + button. Select the topics you’re planning to exclude.
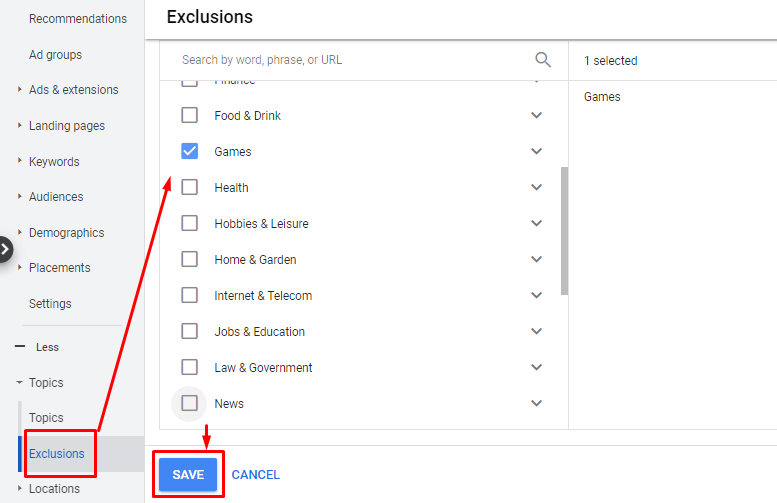 Look through the list of topics and exclude the irrelevant ones
How to exclude specific sites and videos
Select Placements in your Google Ads account and click the Exclusions tab. Now click the pencil icon Optimization and choose whether you’d like to exclude placements at the campaign, ad group, or account level.
From here you can do one of the following:
- Search for a word, phrase, URL, or video ID you’d like to exclude.
- Click Enter multiple placements and enter the URL(s) you’d like to exclude.
- Select Use placement exclusion list and select your list.
3. Ignoring your placement reports
Let’s say you’ve set all the necessary exclusions, but you still get impressions on irrelevant websites and waste part of your budget.
How to handle the issue: Constantly review your placement reports and update your exclusion list.
Click the reporting icon, then go to “Reports” and, in the “Display/Video” section, choose “Automatic placements (group).” From here, you can exclude placements individually.
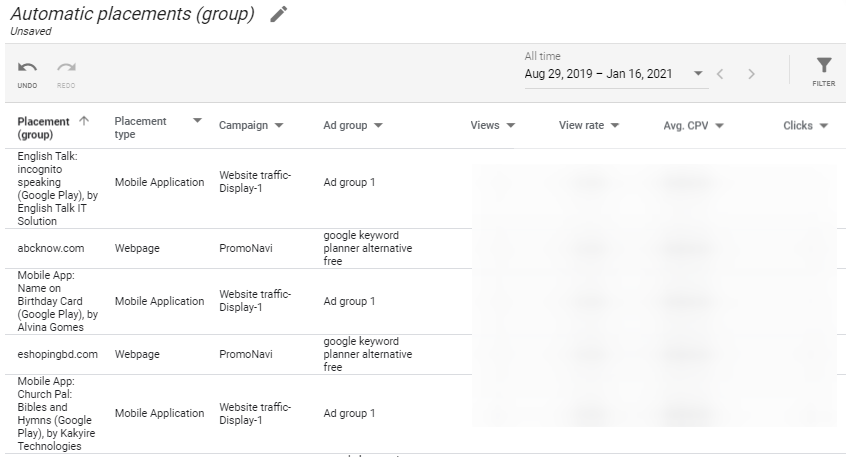 An example of the Automatic placements report
Also, you can schedule report emails.
Click the Schedule icon, enter the recipient’s email, set up the frequency and the format of the report.
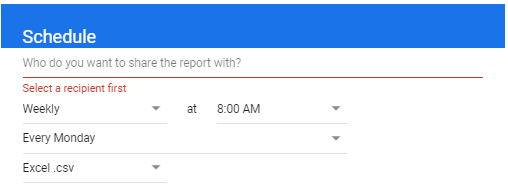 Setting up the report scheduling
You can do this for every predefined or customized report.
How to Set Up Automated Rules in Google Ads [10 Real-Life Examples]
4. Not setting up device bid adjustments
While running your ads you’ve probably noticed that audiences that came from different devices perform different Conversion Rates. For instance, mobile users are not used to download PC software or sign up on SaaS platforms.
How to handle the issue: Specify a desktop, tablet, or mobile bid adjustment at the campaign level or the ad group level. In this case, you will not waste your budget on a low-converting audience.
To adjust bids, go to the campaigns or ad groups that you’d like to modify.
Under Device bid adjustment in the edit panel, enter a value for Desktop, Mobile, and Tablet—from -90% to +900%.
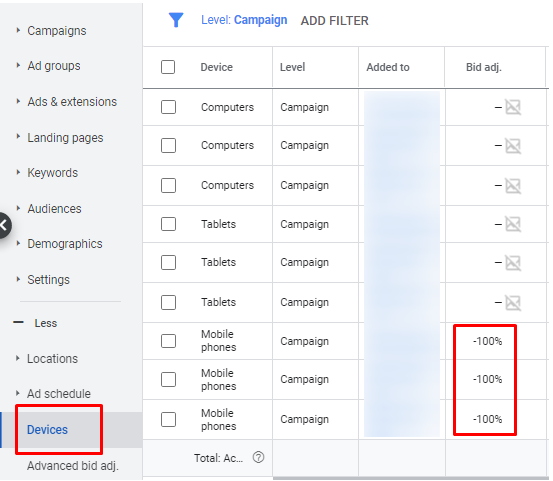 You can enter -100% to opt-out of a device for the selected campaign or ad group
For example, if your ad group bid is $1.00, and the campaign has a mobile bid adjustment of -50%, the bid for ads appearing on mobile devices will be reduced to 0.5%. If you put a bid adjustment of +900%, your bids will rise to $10.00.
To monitor campaign performance and get recommendations on how to adjust bids for devices, use PromoNavi’s Device Bid Adjustment tool.
The tool suggests either an increase or a decrease to the current bid for each targeted device (desktop, mobile, and tablet). The goal is to drive more traffic to better performing devices while decreasing the budget to the poorer performing ones.
 You can adjust bids in Google Ads directly from the PromoNavi interface
Learn more about the Device Bid Adjustment tool.
5. Not setting up local bid adjustments
The problem is similar to the previous one. Audiences from different locations may show different Conversion Rates.
How to handle the issue: Add or update bid adjustments for targeted locations.
To adjust bids, go to “Locations” and enter a value from -90% through +900% for selected locations.
Similar to device bid adjustments, you can automate bid adjustments for targeted locations. PromoNavi’s Location Bid Adjustment tool analyzes performance by location to create bid adjustment recommendations and ensure your campaigns’ best performance.
 You can adjust bids by location in Google Ads directly from the PromoNavi interface
Learn more about the Location Bid Adjustment tool.
6. Over-engineered bid structures
As a marketer, you probably want to profit from all the bid adjustment options in each campaign. For this, you use bid modifiers for location, device, age, time of the day, income, and so on. But you end up with some final bids with 500% above the initial CPC, and others are almost $0, and it’s useless trying to understand the cost of every single click.
How to handle the issue: To have a clear bid structure, choose 2-3 adjustments with the largest impact on your conversion rate.
When you’re using more modifiers, you may have multiple thousands of bid combinations.
Moreover, if your script operates minimum data before setting a modifier, the system will be totally confused. For example, 1 click and 0 conversions mean that the CPA was $0 and the ROAS (Return of Ad Spend) was 0%; therefore, the bids need to be lowered.
7. Outbidding Yourself
When you add keyword duplicates to different ad groups, this leads to internal keyword competition and increasing CPC.
How to handle the issue: Avoid adding the same keywords in different ad groups. Another thing to do is look into your keyword match type settings and check for the same keywords with different match types.
How to find duplicate keywords
Go to the Google Ads Editor and click Select Tools, choose “Find duplicate keywords.” Select the part of your account where you want to search for duplicates (the whole account, specific campaigns, or ad groups).
Select the criteria for your search:
- Word order
- Match types
- Location of duplicates
- Hide duplicates (optional)
Now, click “Find duplicate keywords.”
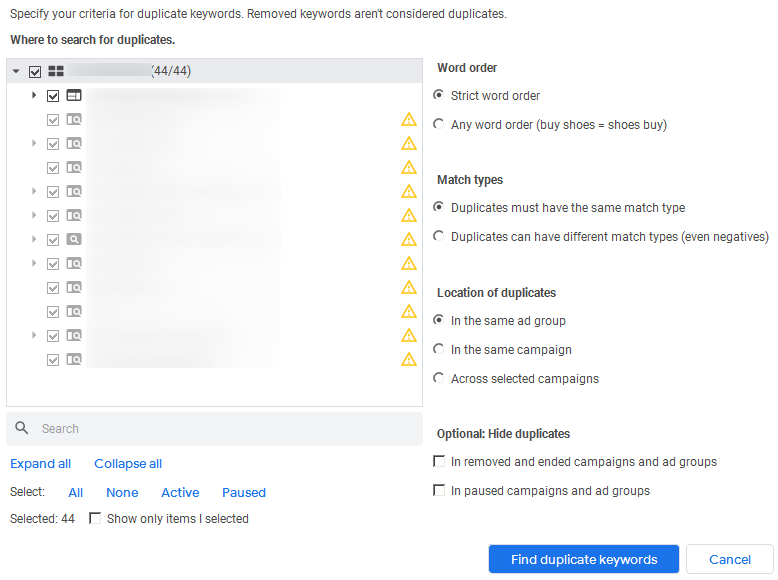 The “Find Duplicates…” settings in Google Ads Editor
From here, you can edit or remove duplicate keywords. If you have a large number of duplicate keywords, you can sort the list using column headers or perform an advanced search to narrow down the list.
After you’ve found duplicate keywords, use the “Select duplicates by…” drop-down menu to quickly select from the duplicates based on the criteria that you choose: Maximum CPC, First-page bid estimate, Quality score, etc.
 You can edit or remove duplicate keywords with lower performance
8. Not Testing the Optimal Ad Position (It’s Not Always the #1)
Let’s say you are running a campaign, and you are fighting for the #1 position at any cost. As a result, you are outbidding all your competitors and you get a lot of clicks (for a very high CPC), but your conversion rate is insufficient.
How to handle the issue: Lower your maximum CPC, and analyze how the ad performance is changing.
It’s true the ad on the very top gets the majority of clicks, but sometimes ad performance for lower positions, for example, from 3 to 5, are higher. Once you lower your maximum CPC, you will start receiving traffic lower CPC and conversions for lower CPA.
Instead of bid overstatement, we recommend focusing on your Quality Score, as this will help you optimize the budget for getting clicks and conversions on a lower budget.
50+ PPC Automation Tools [The Most Comprehensive Compilation]
9. Not shifting from manual to Smart Bidding
Smart Bidding is a way to leverage Google AI to effectively manage your campaigns. However, some advertisers consider Smart Bidding a kind of black box strategy, because they are not able to entirely control the process.
How to handle the issue: Follow recommendations on how to correctly enable Smart Bidding and get the most of Google’s automated strategies.
If you shift to Smart Bidding correctly, you get an opportunity to improve your KPIs, especially when it comes to scale campaigns.
Part 6. Google Ads Analytics Mistakes
10. Not tracking goals
Let’s say you are getting leads from the Google Ads campaign, but you don’t know where they are actually coming from, which ad groups and ads show the best performance, and where you are just wasting your budget.
How to handle the issue: Set up conversion tracking for your website. Without this practice in place, you can’t do a proper analysis and optimize your campaign for profitability.
What do you need to track:
- Phone calls
- Form submissions
- Button clicks
- Orders
- Payments
- Offline store visits
Choose what you want to track depending on your goals. Follow the step-by-step tutorial for conversion tracking setup from Google Ads Help.
11. Not segmenting your reports
By default, your Google Ads reports show data for all the users; this leads to performance data blurring. For example, if you’re looking through the Campaign performance report, you don’t understand the real performance of mobile, tablet, and desktop users—however, the difference in performance across devices or other segments could be significant.
How to handle the issue: Segment your reports by the network, time of the day, day of the week, geography, device, and more.
Segment is a category that you can add to your campaign’s tables and charts to organize your performance data around that criterion.
For example, if you add the segment “Time of the day,” you can understand the time of the day your customers are more likely to see your ad. This can help you to adjust your bids to the user behavior.
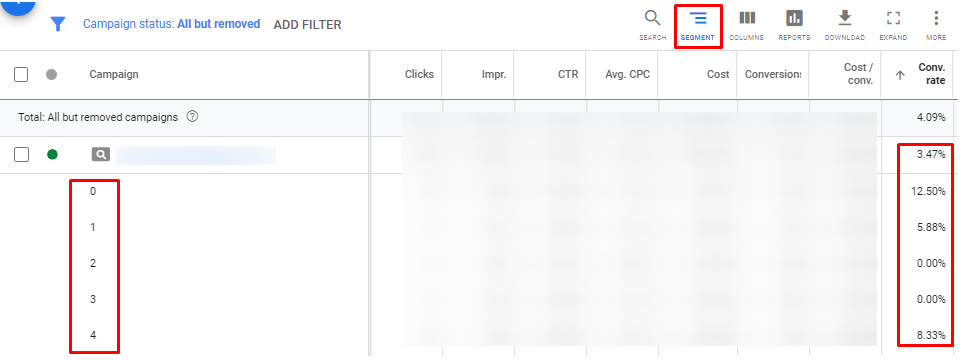 The difference in Conversion Rate by the time of the day
To segment your table’s rows, click the segment icon and select the data you want to isolate. To remove a segment, click the segment icon Segment and select None.
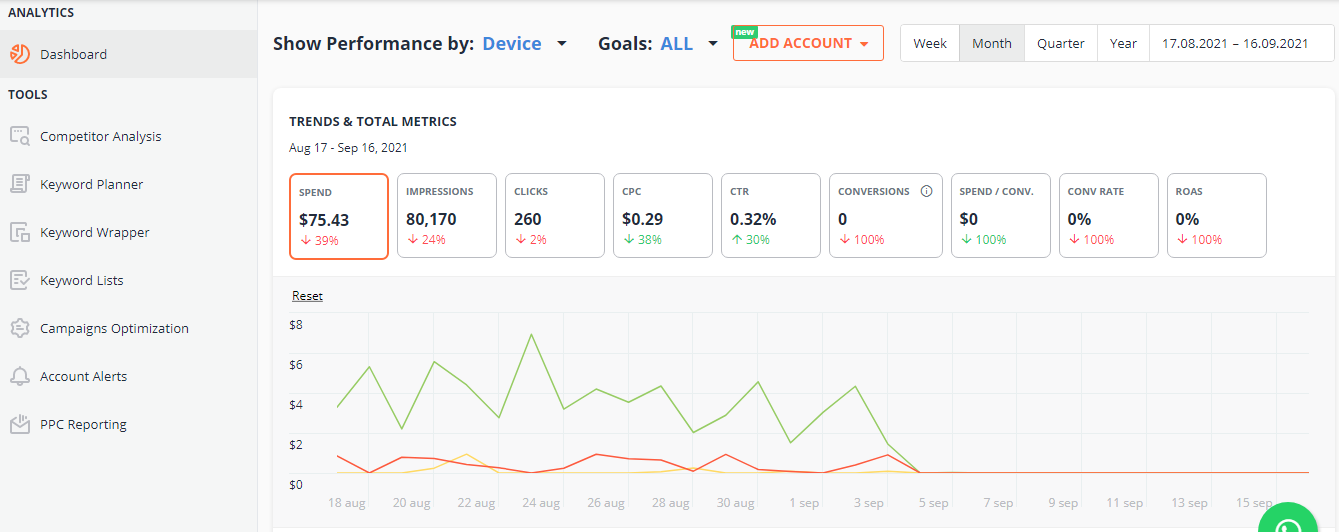
Easily segment your data with PromoNavi’s Analytics Dashboard
PromoNavi’s Dashboard is a convenient tool to track your Google, Microsoft, and Facebook Ads performance from a single place. You can quickly segment your data by device, age, gender, network, and even conversion goals.
All the data is displayed in an interactive and highly visualized way, so you can quickly delve into stats and understand what’s going well or wrong in your accounts.
To start using Dashboard and other PromoNavi tools, just link your Google, Microsoft, and Facebook Ads account. For new users, a 14-day trial with unlimited access to PromoNavi features is available.
12. Focusing only on aggregate campaign data
The problem is that your campaign is underperforming, but you can’t determine what’s wrong when looking at the aggregated campaign-level reports.
How to handle the issue: Take a deeper look into specific reports.
For the Search network campaign, you should deeply examine your Search Term, Quality Score, and Auction Insights reports, and also analyze the performance of each ad in the ad groups.
For a Display network campaign, you should review the Placement reports extremely carefully.
Along with the predefined reports, you can create customized reports with the Report Editor to get more insights into your campaigns.
Regular analysis of your campaigns’ performance at least once per week will help you reduce the underperformance risks.
13. Not Considering your customer Lifetime Value (CLV)
How to handle the issue: The marketing team should analyze and calculate the customers’ lifetime value for the business.
The Customer Lifetime Value (CLV), or Lifetime Value (LTV), represents the total amount of money a customer is expected to spend in your business. This is the KPI you need to know to optimize your PPC campaigns. CLV determines how much the business can spend to attract each customer.
When you’re aware of the CLV rates, you can optimize your campaigns and bid on the keywords that will drive the most valuable prospects and customers to your site. CLV is also essential for setting your budget limits.
Boost your Google, Microsoft, and Facebook Ads performance! Link your accounts to PromoNavi to automate everyday tasks and receive valuable insights on how to improve your campaigns.
With PromoNavi, you can do keyword research, competitor analysis, automate reporting, keep track of your PPC performance in real-time, and get profitable PPC optimization recommendations.
