Shopify is one of the best places to sell products online. But, as any entrepreneur, you surely want more clients for your store, and Google Shopping Ads are a reliable way to attract new customers.
To start with Google Shopping for your Shopify store, you need to create an account in Google Merchant Center and submit a feed with your products. We will explain how to do this in three different ways, and hopefully, you will find the one that suits your needs.
Quick Links
What is Google Merchant Center?
3 Ways to Create a Google Shopping Feed for Your Shopify Store
Create a Google Shopping feed manually in Google Merchant Center
Order feed creation from freelancers
Use third-party automation services: Shopify Apps for Shopping feed creation
What is Google Merchant Center?
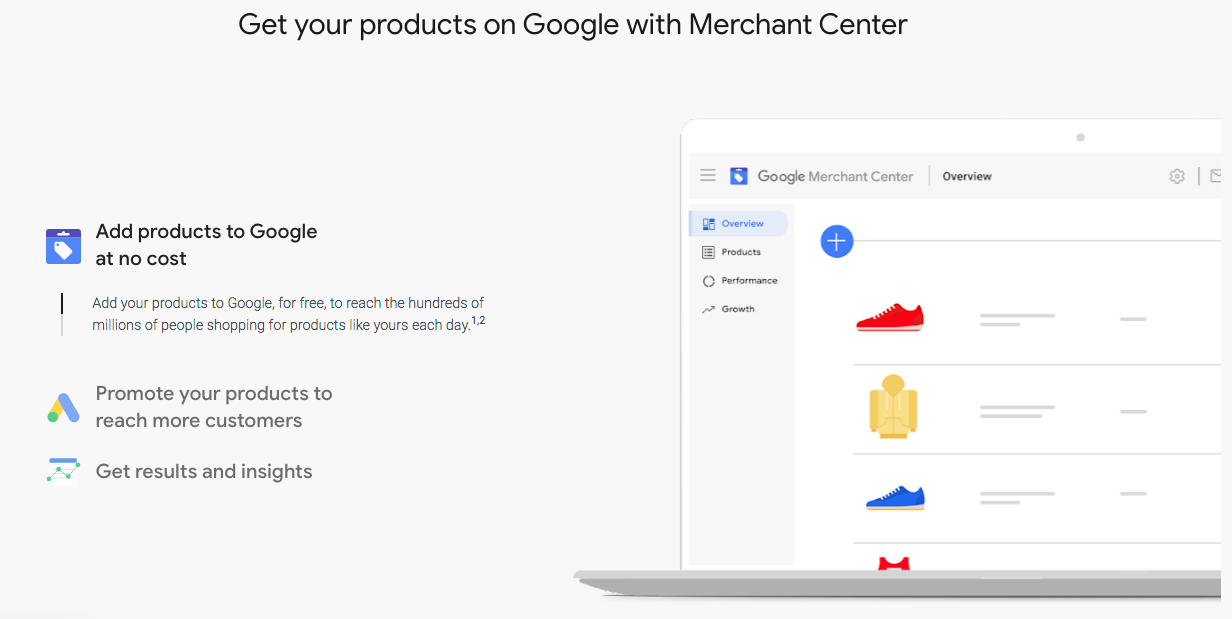
If you want to run Google Shopping ads for your Shopify store, you need to do this through Google Merchant Center. Merchant Center enables you to manage how your in-store and online products appear on Google.
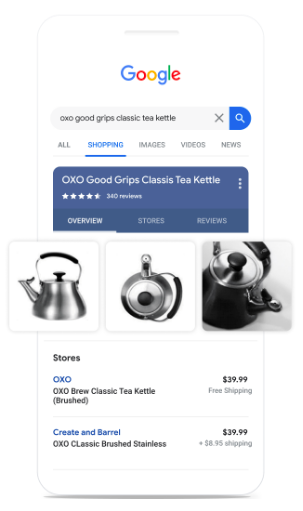
With Merchant Center, you can add products to Google for free to reach users who are shopping online or promote your products through Shopping Campaigns to reach even more potential customers.
What is a Product Feed?
Another important term you need to understand to start with Shopping campaigns is the product feed. A product feed is a file (.XML, .TSV, or other, depending on the platform) that contains a list of products you want to advertise through the Merchant Center.
Google has special requirements for product feeds.
Supported file formats
The system supports XML and Text (spreadsheet) or tab delimited files. Appropriate filename extensions are:
- .txt
- .TSV
- .XML
- .zip, .bz2, .gz for compressed TSV or XML.
Feed Attributes
A feed for Google Merchant Center has both Required and Recommended attributes.
Required attributes include:
| Attribute | Description |
|---|---|
| ID [id] | Your product’s unique identifier; max 50 characters. |
| Title [title] | Product’s name; max 150 characters. |
| Description [description] | Product’s description; max 5000 characters. |
| Link [link] | Landing page URL; start with http or https. |
| Image link [image_link] | The URL of your product’s main image; start with http or https. |
| Price [price] | Product’s price; numeric, ISO 4217 for the currency. |
| Availability[availability] | Your product’s availability. [in_stock] / [out_of_stock] / [preorder] / [backorder]. If product availability is set to preorder or backorder, the attribute Availability date[availability_date] is required. |
Some of the attributes required under certain conditions:
| Attribute | Description | Condition |
|---|---|---|
| Brand [brand] | Your product’s brand name; max 70 characters. | Required for all new products, except books, movies, and musical recording brands. |
| GTIN [gtin] | Product’s Global Trade Item Number (GTIN). | Required for all new products with a GTIN assigned by the manufacturer. |
| MPN [mpn] | Product’s Manufacturer Part Number (MPN). | Required if your new product does not have a GTIN. |
| Condition [condition] | The condition of your product at time of sale: [new] / [refurbished] / [used]. | Required if your product is used or refurbished; optional for new products. |
| Adult [adult] | Indicates that a product includes sexually suggestive content: [yes] / [no]. | Required if a product contains adult content. |
| Multipack [multipack] | The number of products sold within a multipack. | Required for multipacks in some countries, including the UK, US, Australia, and others. |
| Bundle [is_bundle] | Indicates a product is a custom group of different products featuring one main product: [yes] / [no]. | Required for bundles in some countries, including the UK, US, Australia, and others. |
| Age group [age_group] | The demographic for your product: [newborn] / [infant] / [toddler] / [kids] / [adult]. | Required for all apparel products in the UK, US, Brazil, France, Germany, and Japan. |
Some of the Recommended attributes include (there are many more to choose from):
| Attribute | Description |
|---|---|
| Mobile link [mobile_link] | Product’s mobile-optimized landing page. |
| Sale price [sale_price] | Product’s sale price. |
| Subscription cost [subscription_cost] | A monthly or annual payment plan. |
| Google product category [google_product_category] | Google-defined product category for your product. |
| Product detail [product_detail] | Additional details of your product, including technical specifications. |
If you want to learn more about feeds, visit the Help section of Google Merchant Center.
Do you want to advertise your products Microsoft? Here is a guide on how to run shopping ads using Microsoft Advertising.
3 Ways to Create a Google Shopping Feed for Your Shopify Store
Depending on your needs, skills, time, and budget, there are at least three ways to create a feed for your store in Google Merchant Center. The first option is doing it manually, the other is hiring a freelancer, and the third is using a third-party service that will do the work automatically for you.
Let’s discuss how it is done and the pros and cons of each option.
Create a Google Shopping feed manually in Google Merchant Center
Pros: It doesn’t cost you extra money, and you are in full control of everything you do.
Cons: You have quite a lot of manual work to do. Additionally, you need time to learn how to do everything correctly, and maybe, you will even have to learn from your own mistakes.
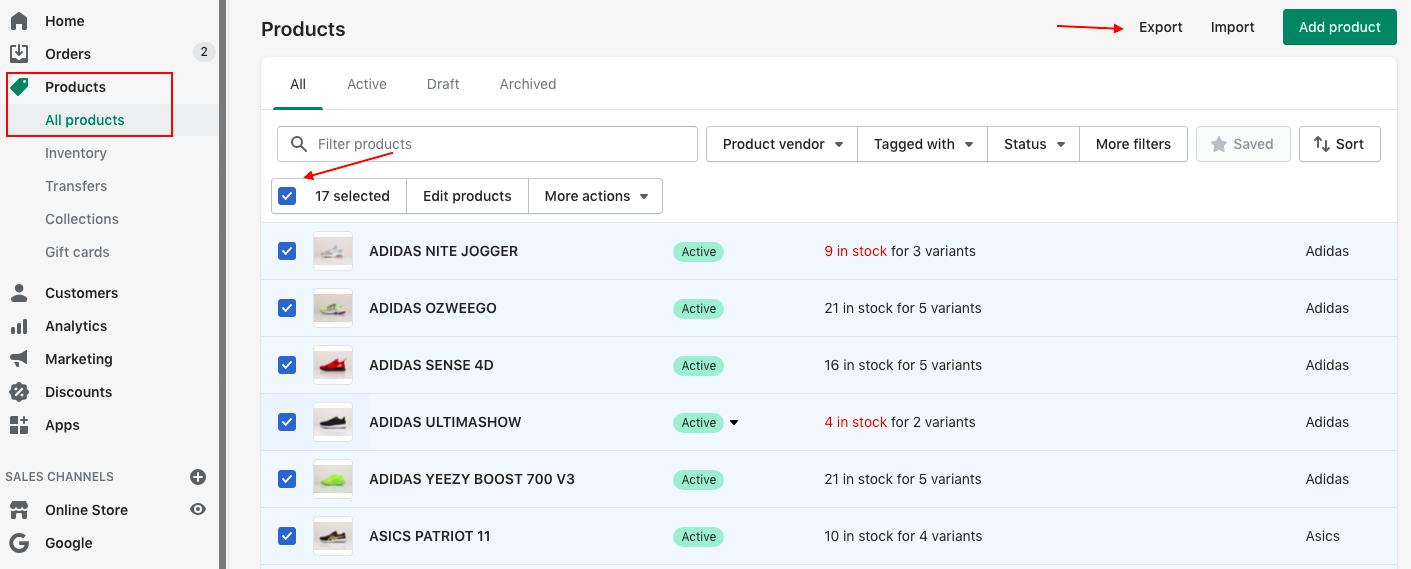
To get started, you should export products from your Shopify store. Navigate to All products in the Products section and select products you want to add to your feed. Click Export.
A popup will open, and, again, you can select what you want to export and choose the file type.
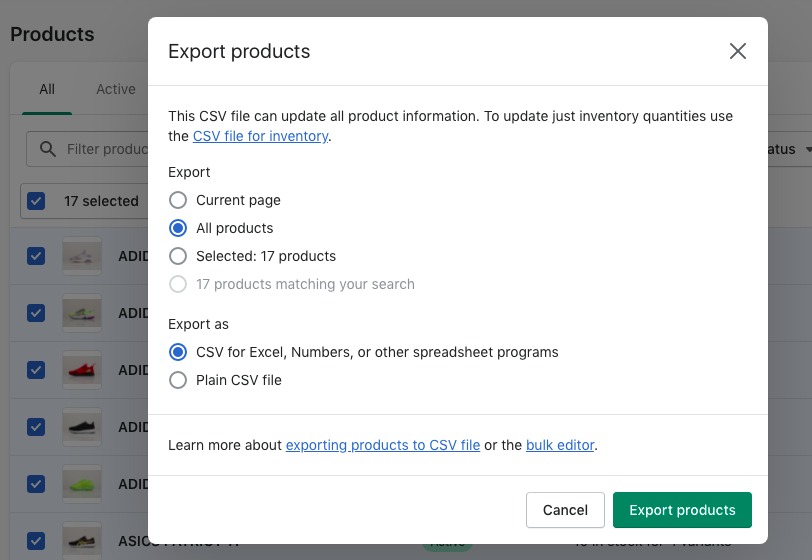
As you already know, Google Merchant Center doesn’t support CSV files. This means you should convert your file into .txt, .TSV, or .XML format.
Now, you can go to Google Merchant Center. After you sign up and fill out details about your business, you can proceed to the feed creation. We will walk you through the process of adding multiple products at once.

First, you need to choose the countries where you sell your products and the language of the content of your feed.
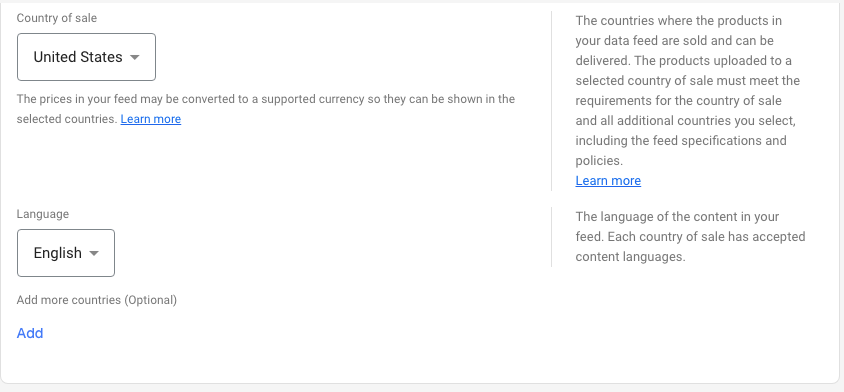
You can add multiple countries and languages. For every country, there is a list of accepted content languages.
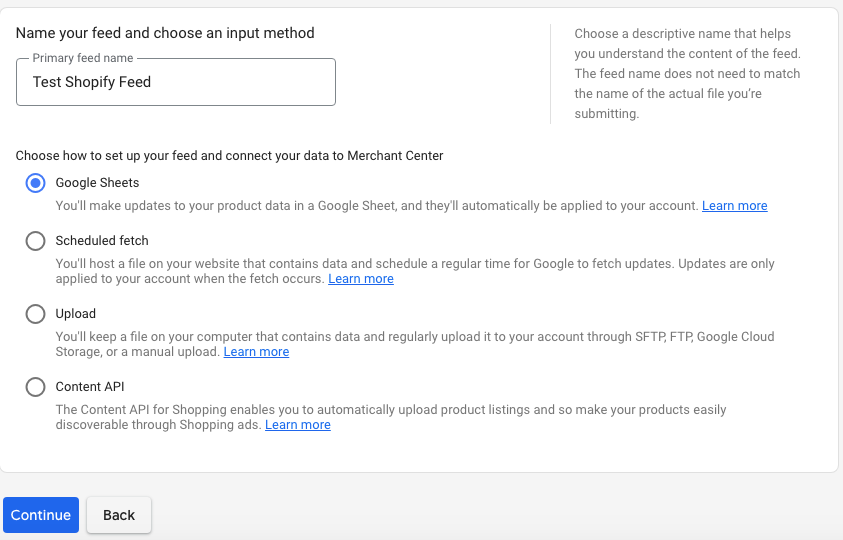
Next, name your feed. Now, you need to choose how to set up your feed and connect data to Google Merchant Center to keep your feed up to date.
You have the following options to choose from:
- Google Sheets: You can make updates to your product data in a Google Sheet, and the system will apply those updates to your account).
- Scheduled fetch: You will host a data file on your website and schedule a regular time for Google to fetch updates.
- Upload: You will have a data file on your computer, and you’ll have to upload updates manually and regularly or through SFTP, FTP, or Google Cloud Storage.
- Content API: This feature enables you to upload data automatically.
Depending on the option you choose, the system will walk you through the setup process. Let’s see how it is done if you select the Upload option.
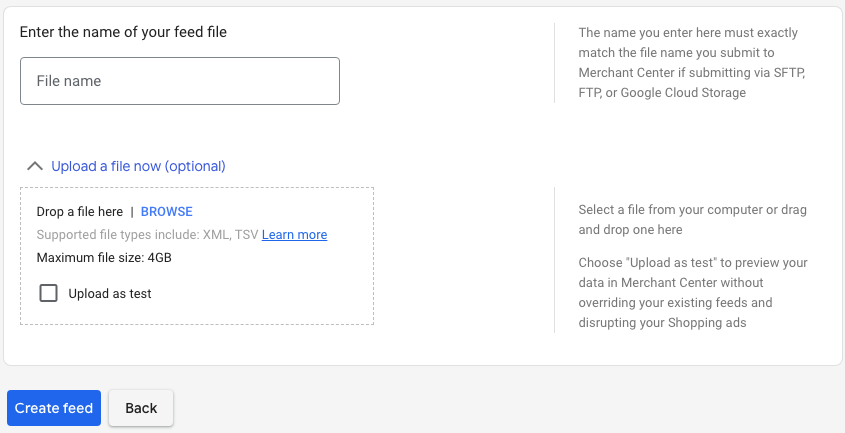
First, enter the name of your feed file. The name must be exactly the same as the file name you submit to the Merchant Center if you use SFTP, FTP, or Google Cloud Storage. Next, upload your XML or TSV file. You can first upload a file as a test to preview your data without overriding your existing feeds.
If the system finds some errors, you will see something like this. Click the Diagnostics link to see all issues and recommendations on fixing them.

After you fix all of the issues, your feed will be ready to use.
Order feed creation from freelancers
Pros: The only thing you need to do by yourself is to find and communicate with the contractor. Freelancers with experience in Shopify and Google Ads can do everything quickly and effectively.
Cons: You have to spend time choosing a responsible and experienced contractor with good reviews and reasonable rates. Besides, creating a feed for Google Merchant Center is usually not a one-time task; you need to update your feed regularly. This means you have to pay a freelancer every time you need an update. In a bad-case scenario, that person could be unavailable for quick changes.
If everything you have read above seems way too complicated for you, you can try working with a freelance marketer. There are many websites where you can find contractors who will do the work for you.
Go to Upwork, Freelancer, or other freelance platforms, and type in queries like Google Merchant Center, Google Shopping Feed, Shopify Product Feed. You will find hundreds of specialists offering their services, with prices ranging from $10 to $100 per hour.
Use third-party automation services: Shopify Apps for Shopping feed creation
Pros: Professional apps are easy to use, even for someone with little or no marketing experience. Wizards do all of the work for you; you just need to follow the setup process and make a few clicks. Advanced services like PromoNavi offer much more than just feed creation.
Cons: Good things are rarely free. However, automation apps cost almost nothing compared to in-house marketers or even freelancers.
Luckily, some services on the market now can do the work for you without the need to hire someone, and in just a few clicks. For example, when searching for something like Google Merchant Feed Generator, you can find those third-party services in the Shopify App Store.
How to create a feed and Shopping campaigns in Google Merchant Center with PromoNavi’s app
To get started, you need to install the PromoNavi app from the Shopify App Store.
Google Shopping Feed wizard for Shopify shop owners is accessible from the Campaign Builder section in your PromoNavi account.

After you sign in with Google, PromoNavi will receive available Google Merchant lists for your account. Next, the system will verify and claim your store website, and the wizard will take you to the next step.
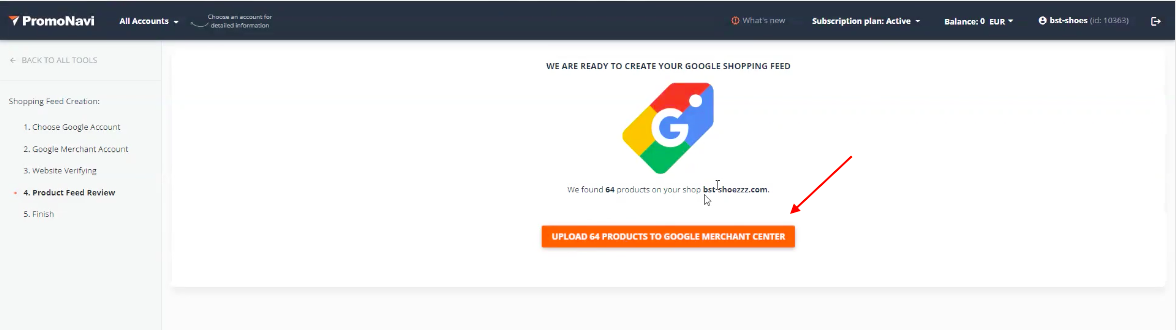
Now, you are one click away from uploading products from your Shopify store to Google Merchant Center.
PromoNavi will moderate your feed manually. If some Google categories are missing, our team will add them for you, and only after that step, we will send your feed to the Merchant Center. We make this extra effort to ensure Google will approve your feed, and you don’t have to deal with system errors and disapproval. This usually takes no more than one hour, and you’ll receive an email when everything is ready.
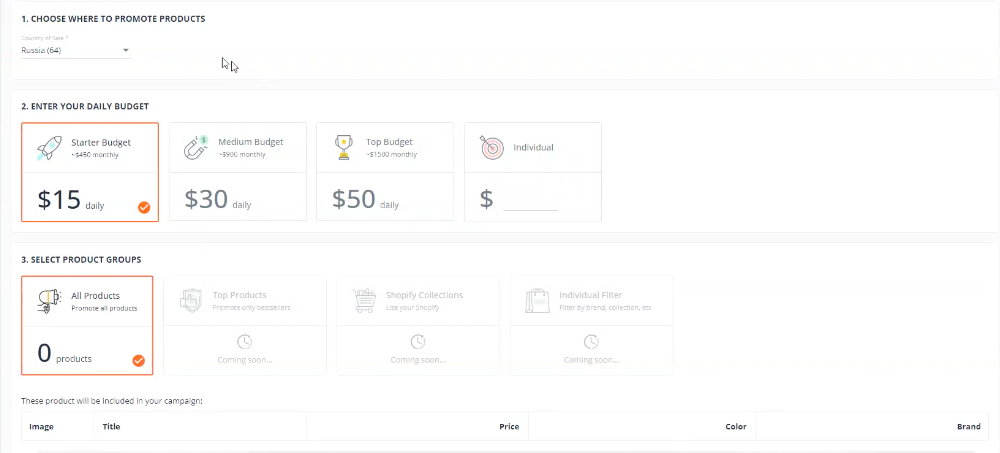
However, you can do more than just create a feed optimized for Google Merchant Center. From the same wizard, you can create a Google Smart Shopping Campaign.

The setup process is straightforward. You choose the countries where you want to promote your product, set a daily budget, and select product groups. You can run ads for all products or choose from other options: Top Products (your bestsellers), Shopify Collections (collections from your store), or use an Individual Filter (by brand, color, collection, price, etc.).
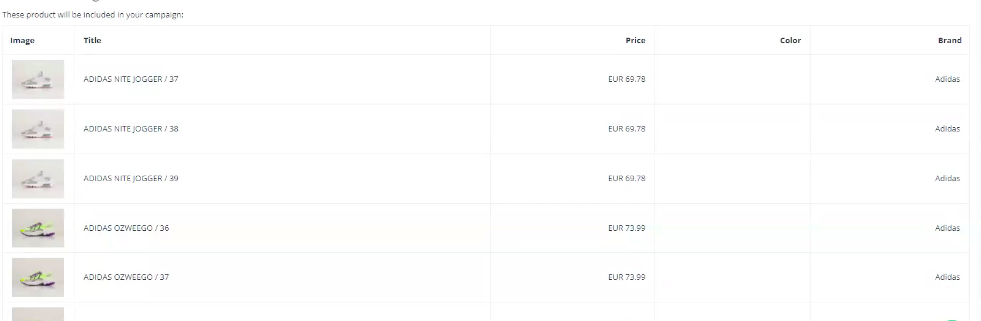
After you select product groups, you will see products for this campaign:
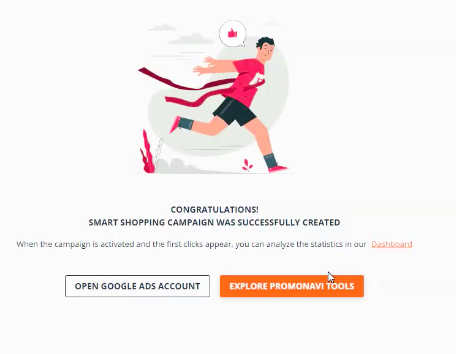
After you click Create a Shopping Campaign, the system will send your feed and settings to your Google Ads account and activate your new campaign.
After you launch a campaign, you can analyze your ad performance using PromoNavi Dashboard.
When you opt-in for the PromoNavi App, you get access to all the PromoNavi tools, including Keyword Planner, Reporting, Alerts, Competitor Analysis, and others.
Final Thoughts
As a busy eCommerce entrepreneur, you may not have a lot of time for investigating marketing nuances, especially the technical part of it. That’s why we find it reasonable to work with professionals or use automation services. Sure, you can try handling everything yourself, but the money you save may cost you too much time and effort. However, it’s a good idea to understand how the process works and what are the system requirements, so you know what’s happening with your account. The choice is yours, and we hope we’ve helped you in making it.
![Keyword Match Types in Google Ads [Ultimate Guide]](https://blog.promonavigator.com/wp-content/uploads/2021/04/match-types-600-360-1.jpg)