Microsoft (formerly Bing) Shopping campaigns can be a beneficial addition to your paid media strategy. While the traffic on Microsoft is much lower than on Google, there is also less competition, the CPC and CPA are lower, and you can get your products exposed to a new audience.
Microsoft Shopping campaigns are similar to those of Google Ads. With these campaigns, you can display your product ads on the Microsoft Search Network with over 14.6 billion monthly PC searches and 699 million unique PC users worldwide.
In this article, we cover how to create Microsoft Shopping campaigns from scratch and import Shopping campaigns from Google Ads to Microsoft. Also, we highlight shopping campaigns optimization tips and common mistakes you should avoid.
What are Product Ads in Microsoft (Bing) Advertising?
How to Create a Microsoft Shopping Campaign
How to create product ads in a Shopping campaign
How to import Shopping campaigns from Google Ads to Microsoft (Bing) Advertising
Tips to Optimize Microsoft (Bing) Shopping Campaigns
Microsoft (Bing) Shopping Campaigns Mistakes to Avoid
What are Product Ads in Microsoft (Bing) Advertising?
Product ads are ads with custom images from your product catalogs (which you create in the Microsoft Merchant Center); also, they contain a title, pricing, and seller details.
Unlike Google’s shopping ads, which appear not only on the search results, but also on Image search, Shopping listings, and Google Search Partner websites, Microsoft’s product ads are displayed only on the top of the SERP and on the right side next to search results on Bing, Yahoo, and AOL.
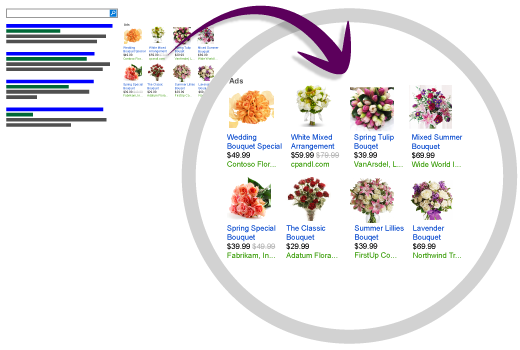 Image source: Microsoft Advertising Help
If you аre a retailer, you can use product ads to promote your online and local shop and acquire qualified leads. However, if you are running ads for a non-eCommerce business, product ads are an unsuitable option for you.
Pros of product ads
- Product ads acquire customers at the bottom of the funnel. People see them when they are searching for an exact product and are about to buy it.
- Product ads appear above the paid and organic search—meaning that you can get more traffic.
- Product ads can be more engaging than text ads as they show an image as well.
- Product ads are easier to implement at scale—you don’t need to create each ad manually.
Cons of product ads
- If you advertise anything other than products available to buy online or offline, you can’t use them at all.
- With product ads, you can’t bid on specific keywords. Instead of keywords, product ads use the product attributes you defined in your Microsoft Merchant Center catalog to show your ads on relevant searches.
- Unlike text ads, you can’t advertise your phone number, opening hours, etc., which could save you unnecessary clicks. In general, you can place less information about the product and the store in product ads than in text ads.
- Product ads and Microsoft Shopping Campaigns are available in a limited list of countries: US, UK, Ireland, Canada, Australia, Germany, Austria, Belgium, Denmark, Finland, France, Italy, Netherlands, Norway, Spain, Sweden, Switzerland, and India.
How to Create a Microsoft Shopping Campaign
If you don’t have Microsoft Advertising product ads or Google Shopping campaigns, you’ll need to create a Shopping campaign from scratch.
If you already have product ads, either in Microsoft Advertising or Google Ads, you can import your shopping campaign from Google Ads or create a new Microsoft Shopping Campaign to run together with your existing product ad campaign.
How to create product ads in a Shopping campaign
If you have already created Shopping campaigns in Google, then doing the same in Microsoft should be quite easy for you. The setup is very similar. There is a Merchant Center and a product feed (named catalog), but there are some subtle differences as well.
Let’s walk through the setup process.
Step 1. Verify that you own your store
- Go to the Bing Webmaster Tools.
- Sign in with your Microsoft account that you use to sign in to Microsoft Advertising.
- Click Profile and fill out the About Me, Contact Preference, and Alert Preference sections.
- Under My Sites, enter your URL and click Add, and enter your URL info.
- Verify your site with one of the options listed below.
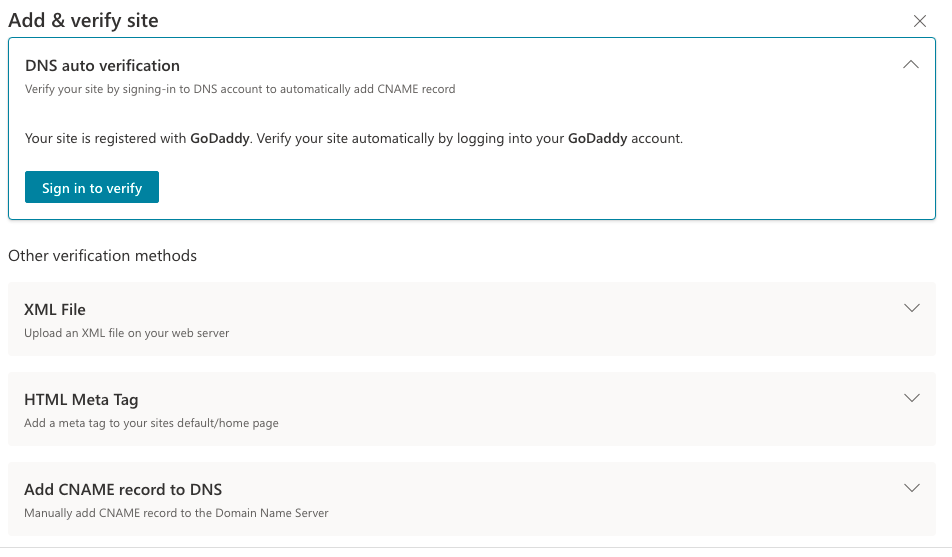
If your URL is verified, you will see the Dashboard page.
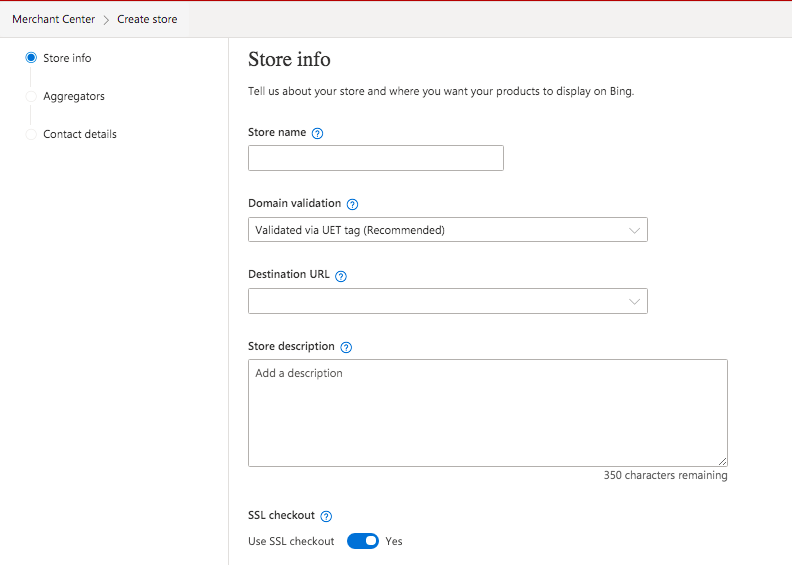
Step 2. Create a Microsoft Merchant Center Shop
On the Microsoft Merchant Center, you can create a catalog with images and other information about your products to be displayed on the Microsoft Search Network.
Product ads pull inventory from the Microsoft Merchant Center feed files that you upload.
1. On the top menu, select Microsoft Merchant Center.
2. Click Create a store.
3. Enter your store information.
- Store name: The system will display the store name in the product ads below the price. The Store name cannot be changed later and it must be between 1 and 70 characters long.
- Domain validation: You can validate your domain via UET (Universal Event Tracking) tag or Webmaster Tools (Step 1). If you want to validate your domain using a UET tag, the tag has to register at least 50 events before you can do it.
- Destination URL: The destination URL is the web page users will be directed to when they click your ad. This URL should match the validated domain.
- Store Description: This description is for your information only. It will not be displayed in your ad.
- Use SSL checkout (Yes/No): Verify that your SSL certificates are valid; Microsoft Advertising will reject stores that are not SSL-enabled.
Step 3. Upload your feed
- From the top menu, select Tools and then click Microsoft Merchant Center.
- Select the store that you want to update.
- Click the Feed Management tab.
- If you are creating your first feed, enter your Feed name. If you are creating additional feeds, click Create New Feed and enter your Feed name.
- Submit your file. You can import your Shopping Feed manually or using FTP. You can also automatically download a file from the URL, or import it from a Google Merchant Center account.
- Set a schedule for automatic feed downloads to keep your catalog up to date. Set download frequency, download day and time, and time zone. From here, you can run or pause your schedule.
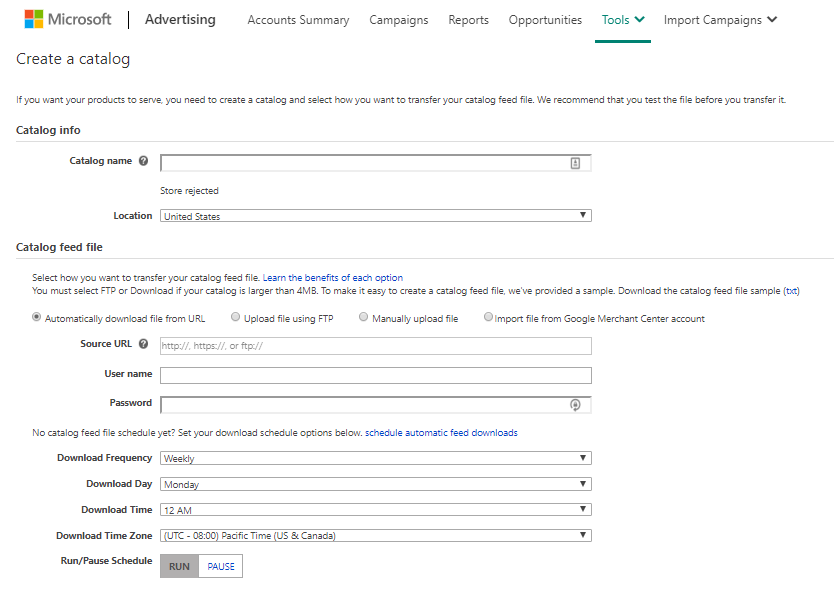
Note: It can take up to 3 business days for your feed file to process after creating a new feed and submitting a feed file.
Step 4. Create your Shopping campaign
- Select All campaigns from the main menu on the left.
- Select Campaigns from the page menu.
- Click Create Campaign.
- Select Shopping campaign. Microsoft Advertising will walk you through the remaining steps.
How to import Shopping campaigns from Google Ads to Microsoft (Bing) Advertising
If you already run Shopping Ads on Google, you can import existing campaigns to Microsoft. This will save you time and you will not need to create a feed and set up a campaign from scratch.
- Go to your Microsoft ad account and from the menu at the top of the page, select Import and then click Import from Google Ads.
- Click Sign in to Google and follow the instructions to permit Microsoft Advertising to import campaigns from your Google Ads account.
- Select the account that you want to import from Google Ads and then select Next.
- Enter the import name, set the schedule, and then select Start import.
Microsoft supports most Google attributes; however, we recommend reading Microsoft’s guide on which Google feed attributes are supported once imported into Bing.
How to customize your import from Google Ads
If you want to choose which items to import, adjust bids, bid strategies and budgets, associate UET tags, and more, select Customize import after selecting Google Ads account.
1. Under Which campaigns and ad groups do you want to import?, select the campaigns and ad groups you want to import from Google Ads and then select Next.
If you select All ad groups in a campaign, Microsoft will import only active ad groups. If you want to import both active and paused ad groups, select Show paused ad groups too.
2. Under Choose which items to import and the options to set for them, choose the items you want to import and customize.
If you want to delete removed items, select Delete items that have been removed from your Google Ads account.
3. Enter the import name, set the schedule, and then select Save. If you leave the schedule set to Auto, Microsoft will automate the schedule to optimize your campaigns in Microsoft Advertising.
On the Import schedule & history page, you can re-run the import, modify the import schedule, and see newly added, updated, or not imported objects. From the top menu, select Import > Import schedule & history.
Tips to Optimize Microsoft (Bing) Shopping Campaigns
Creating a Shopping campaign in the right way is not enough to successfully advertise your products on Microsoft. Here are best practices and tips to optimize your campaigns and ROAS.
Set priority levels
You can set priority levels for each Microsoft shopping campaign.
Microsoft has three priority levels: Low, Medium, and High. Setting a particular campaign priority to High will cause it to display ads more often than other campaigns with a priority set to Low or Medium. Set your more profitable and important campaigns on High priority.
Set higher bids for better-performing products
Monitor your ads performance and adjust bids if necessary. To receive more impressions and maximize ROAS on the best-performing products, set higher bids on best-performing ads.
Create custom audiences
Once your ads go live, you can create a narrow audience to tell Microsoft who you want to reach, and don’t waste money on users outside your target audience.
To create an audience, go to Shared Library > Audience, and select View Audiences.
Set up remarketing audiences
Unfortunately, you can’t import remarketing lists from your Google Ads to Microsoft Advertising account. So you need to set up remarketing audiences manually.
To do this, go to the Audience section and select Create a remarketing list. Keep in mind that you need to set up Microsoft’s UET (Universal Event Tracking) tags.
Enable Local Inventory ads for offline shops
If you have an offline shop, it makes sense to use Microsoft’s Local Inventory feature. Your ads will appear for localized queries (cities, states), and «near me» searches.
To enable Local Inventory ads, you need to provide the physical location of your shop, and the rest is the same as with regular Shopping campaigns.
Use custom labels to better analyze campaigns and improve targeting
Using Labels, you can organize ads, ad groups, and campaigns in a convenient way. It won’t impact your ads directly, but with labels you can improve your targeting in the future and better analyze your campaigns.
Use Microsoft ad extensions for Shopping campaigns
Add extensions to your product ads to stand out from competitors and provide users with more information. For example, you can add a call-to-action with Action extensions, average reviews for your products with Review extensions, or sitelinks to the landing page with Sitelink extensions.
Microsoft (Bing) Shopping Campaigns Mistakes to Avoid
If you are new to Microsoft Shopping ads, make sure you avoid these costly pitfalls.
Starting from scratch
If you already run Shopping Ads on Google, import your existing feeds and shopping campaigns to save time and effort.
Lack of feed optimization
Map out all your product data extensively and avoid having extremely short titles for your products. For example, compare two titles: «Levi’s 501» and «Levi’s 501 Women’s Blue Jeans.» The second one is much more specific.
Don’t ignore additional feed attributes. Take the time to fill as many fields as possible, such as colour, size, material, or other specific details.
Ignoring keywords in titles and descriptions
Add more keywords to your product titles and descriptions to help them show up for the profitable search terms.
Using wrong images
Follow Microsoft’s image requirements. Images must be 220×220 pixels or larger without any kind of watermarks. Use minimal surrounding whitespace; only about 10% of your image. Microsoft will very likely not approve images with more than 60% whitespace.
Not enabling automatic item updates
It not only saves your time but also protects your campaigns. Too many mismatches between your site and Microsoft can get your account suspended or disapproved, so automatic updates can reduce the inconsistencies.
No device optimization
To reach mobile audiences, you should modify your bid boosts for smartphone and tablet devices (from -100% to +100%) in the campaign’s settings.
Not using negative keywords
Shopping campaigns don’t use keywords to trigger the product ads, but you should use negative keywords to prevent your products from showing in response to irrelevant and poor-performing queries.
You can add the most obvious negative keywords when setting up your campaign. Then, you should look through your search query report to uncover irrelevant ones and add them to your negative keyword list.
Starting with a too low budget for Shopping campaigns
Having too low a budget will not allow you to reach your audiences effectively. For example, your campaign can run out of budget by afternoon, while your audience is more active in the evening.
Microsoft recommends starting with allocating 30% of your total budget to Shopping campaigns.
Not using the available Microsoft Advertising reports
Track performance using Product ad and Shopping campaign-specific reports. You will find the Shopping report on the Dimensions tab. Other useful reports include the Share of voice report and the Search term report.
We hope you found this blog post helpful and we are happy to keep you up to date with other articles about paid advertising.
Make the most of your PPC campaigns with PromoNavi! Save time managing your Microsoft, Facebook, and Google Ads accounts within a single platform and get profitable insights to boost your KPIs. Get started with a 14-day trial with unlimited access to all the features!

![How to Promote Construction & Renovation Services [The Comprehensive Guide & Checklist]](https://blog.promonavigator.com/wp-content/uploads/2021/11/construction-promotion-600-360.jpg)