In a previous post, we’ve described how to drive more Google Ads clicks with PromoNavi’s automated tools. Another significant task for marketers is to find ways of reducing inefficient ad spend.
Read on to find out how to spend less money on your campaigns.
4 Ways to Stop Wasting Your Ads Budget
To avoid inappropriate budget spending, you can:
- Add negative keywords to your campaign. Negative keywords help you focus on keywords that really matter to your potential customers. With correct negative keywords, you don’t waste your budget on «empty» clicks.
- Stop keywords with poor user behavior metrics. These keywords don’t drive an interested audience and spend your budget ineffectively, and you should remove them.
- Use device bid adjustments. Increasing/decreasing bids for the types of devices that show good/poor performance metrics helps you optimize Cost Per Action (CPA).
- Use location bid adjustments. Increasing/decreasing bids for locations that show good/poor performance metrics help you spend your budget effectively.
So, we’ve got 4 ways of reducing inefficient Google Ads spending. Let’s take a closer look at how to implement them.
#1: Add Negative Keywords to Your Campaign
Running your campaign with broad or phrase match keywords inevitably leads to irrelevant clicks. Moreover, the share of such clicks often exceeds 50%—you could be wasting more than half of your budget!
Take a look at an example. We’re running a campaign for a health and wellbeing platform. Along with relevant search queries like “workplace wellbeing” or “corporate wellbeing,” we’re getting clicks from irrelevant queries like “support remote teams meaning” or “feedback on wellbeing at work.”
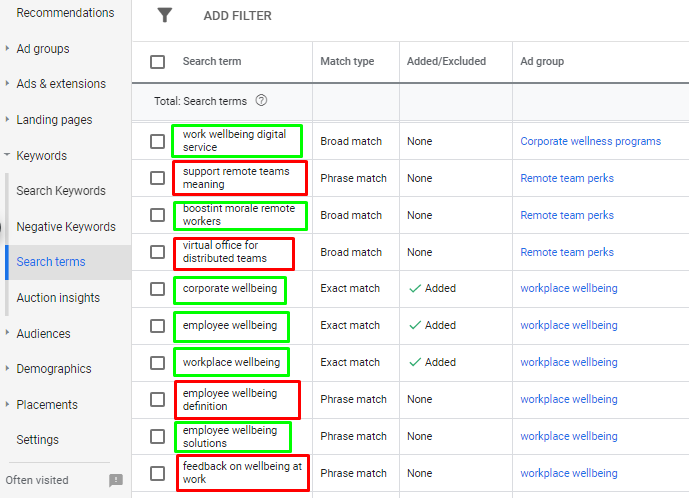 An example of irrelevant PPC search terms
What we can do to reduce the share of irrelevant traffic:
1. The seemingly obvious solution is to use an exact match for all keywords. This protects you from drawing in irrelevant clicks.
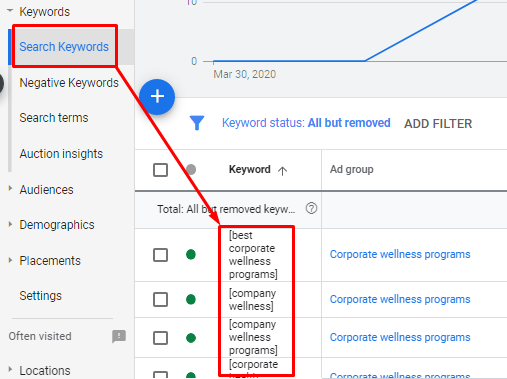 The exact match keywords are taken into square brackets
But, choosing an exact match leads to a narrower reach, and the audience is reduced. Simply put, you’ll get a few clicks instead of strong traffic flow.
2. The other way is to add negative keywords to your campaign. Negative keywords block ads from showing up for irrelevant search queries. This is a universal technique suitable for all niches and audiences. Let’s dive into it.
How to Automate Negative Keyword Research
To add negative keywords, use PromoNavi’s Add Negative Keywords tool. This tool suggests negative keywords based on search queries that drive traffic but have high bounce rates and low average time on site, meaning they are ineffective. You can use these inefficient queries as negative keywords to cut off non-converting clicks.
The tool combines data from Google Ads and Google Analytics, so you’ll get a consolidated report on all the performance metrics for each suggested search query.
This tool is available after signing up and connecting your Google Ads account to PromoNavi.
After the account is connected, go to “Campaign Optimization” and choose “Add Negative Keywords.”
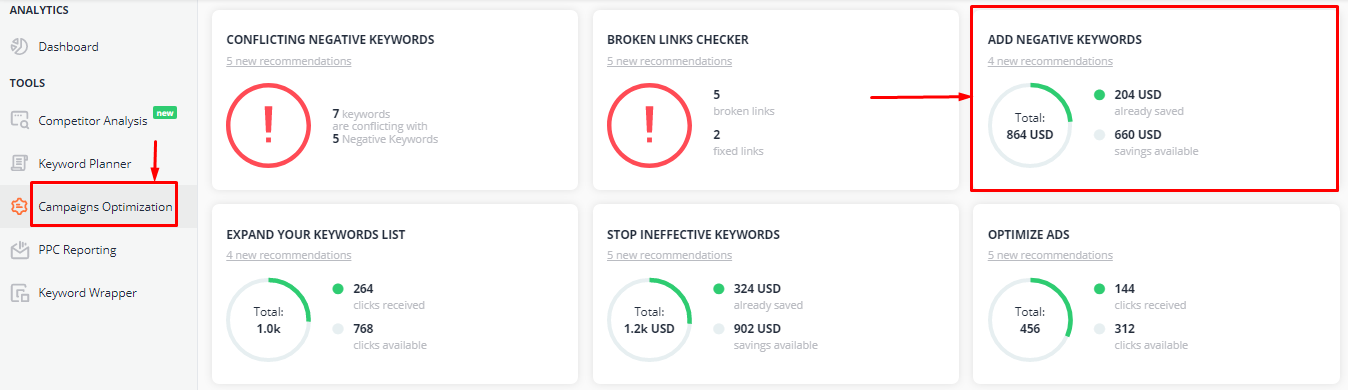 A dashboard with the PromoNavi recommendations
Сhoose the campaigns for which you want to get negative keyword recommendations.
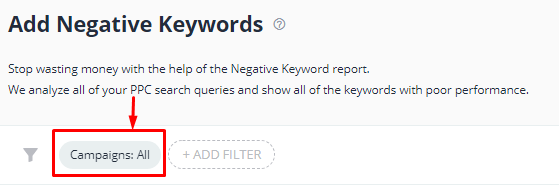 By default, the system shows data for all campaigns in the selected account
The tool analyzes your campaign’s search queries and lists exact match negative keywords in a table. Metric values with poor performance are marked in red.
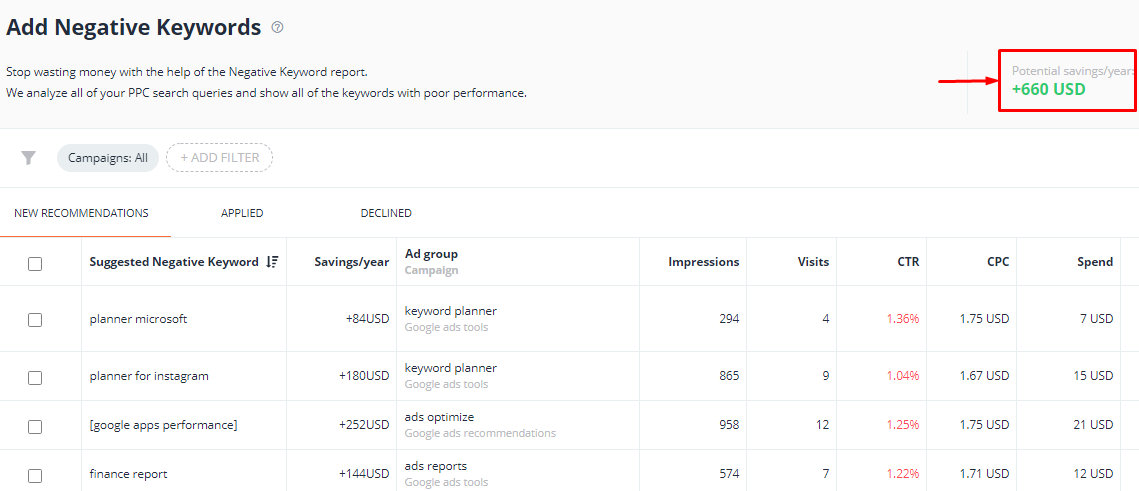 The table of suggested negative keywords
You can see the potential savings from applying all the suggested negative keywords in the top right corner. For the campaign analyzed in the example above, the potential savings are $660. Not bad at all!
You can apply all those negative keywords or just choose some of them. Take a look at the metrics for each negative keyword and make some decisions around your priorities with those metrics: Visits, CTR, CPC, Spend, Avg Time, % Exit, and Conversions.
Note! The source of this data is Google Analytics for the last 30 days. You should link your Google Analytics account to PromoNavi to get all these metrics.
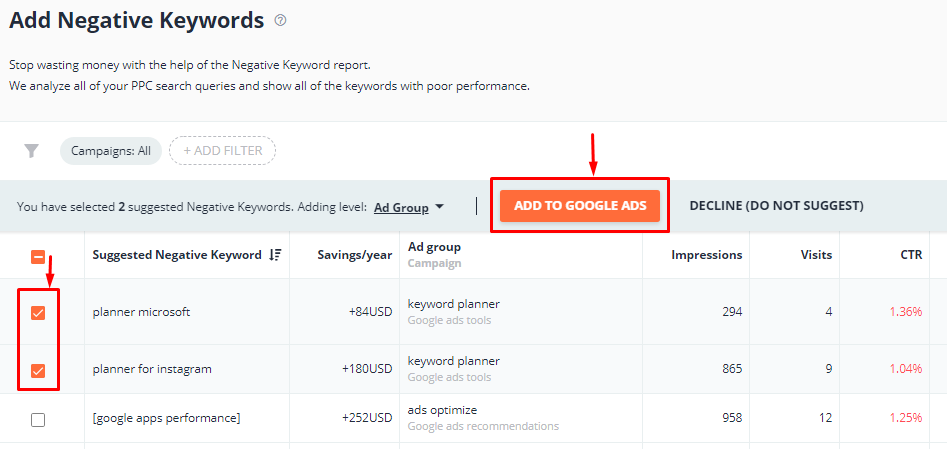
To add negative keywords to a Google Ads campaign, choose them and press the “Add to Google Ads” button above the table. Negative keywords will be added to your Google Ads account automatically.
 Add negative keywords to your Google Ads account
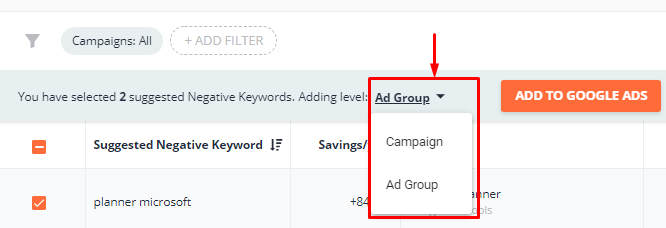
Apply the selected negative keywords at the campaign or ad group level.
 Choose the level on which you will add the negative keywords
If some negative keyword suggestions are ineligible, decline them.
After adding negative keywords, you could change their match type.
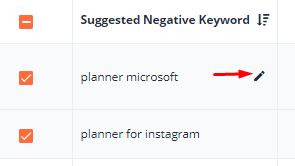 To change keyword match type, hover the cursor over the keyword and press the pencil icon
Remember that broad or phrase match specifications may block too much traffic, so we recommend being careful here.
#2: Stop Showing Ads on Ineffective Keywords
Common keyword performance metrics are Cost per Click (CPC), Conversions, Conversion Rate (CR), and Cost per Conversion (Cost./Conv.). But is that enough? Not really. You should also consider behavior metrics such as bounce rate, average time on site, etc.
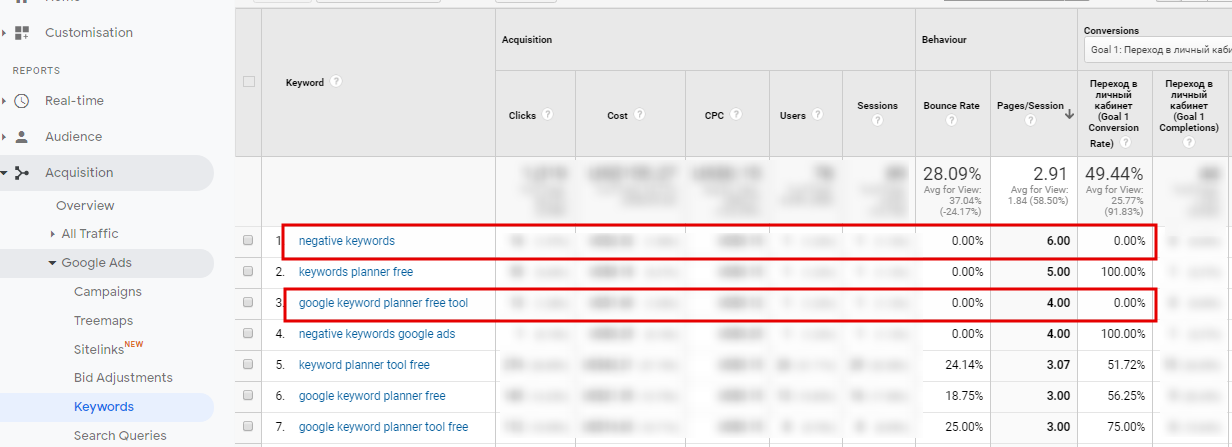
Look at the Google Analytics keyword report. The phrases “negative keywords” and “google keyword planner free tool” bring no conversions. At the same time, the bounce rate is 0%, and the Pages per Session metric is high. Thus, we can judge that these keywords drive highly interested users. They may not perform targeted actions right here and now, but they may turn into customers later.
 Behavior metrics in Google Analytics
On the other hand, keywords that drive no conversions and have poor behavior metrics are not sufficient. You can find such keywords and stop showing ads on them with PromoNavi’s Stop Ineffective Keywords tool.
How to Automate Ineffective Keywords Detection
This tool is available like the previous one after signing up and connecting your Google Ads account to PromoNavi.
You will find the tool in the “Campaigns Optimization” section.
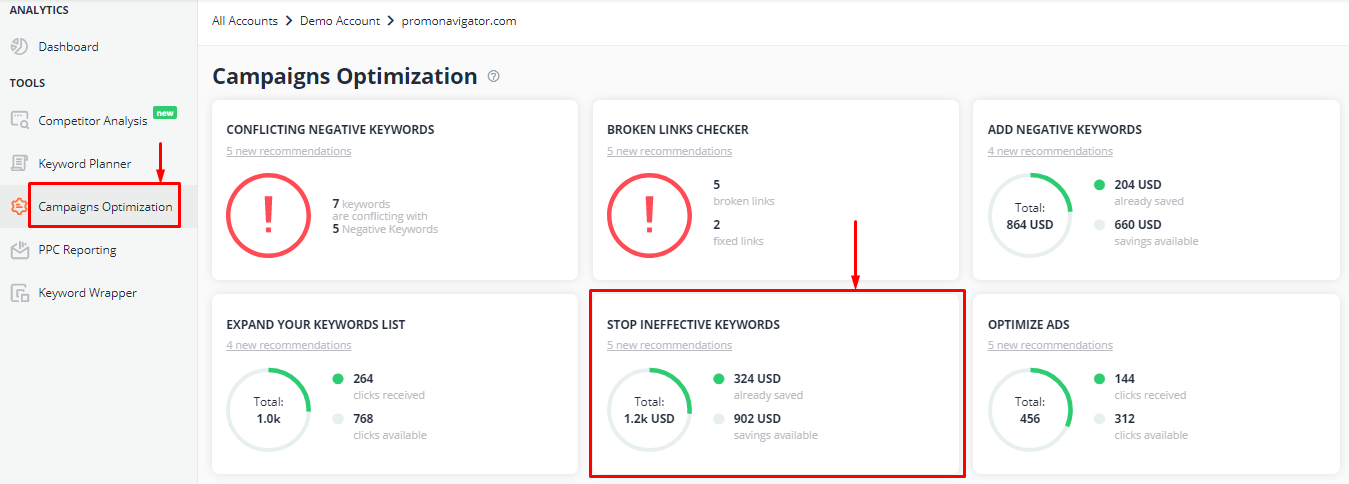 The Stop Ineffective Keywords tool in the PromoNavi interface
The tool finds ineffective keywords, and you can stop running them, saving your budget. The total potential savings (per year) are displayed in the top right corner.
In the example below, the amount of savings is $492.48. Do you remember how much we’d saved using the previous tool? We’ll remind you: $901.8. The cumulative savings, for now, are $1,561.8. Life is getting better.
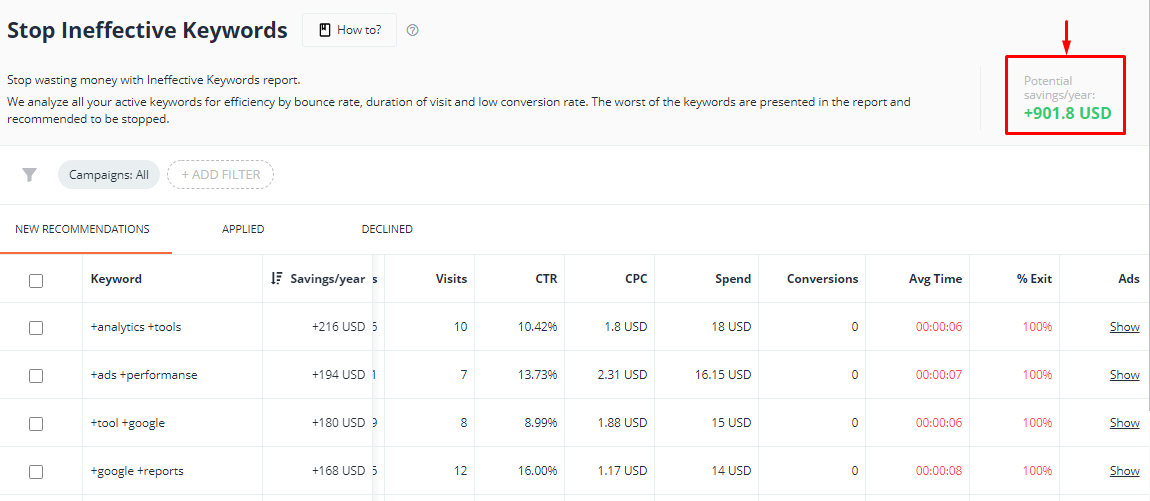 The table of the suggested ineffective keywords
For each suggested ineffective keyword, you can see metrics such as Visits, Impressions, CTR, CPC, Spend, Avg Time, % Exit, and Conversions. The source of this data is Google Ads from the last 30 days.
To stop specific keywords, select them and press STOP THESE KEYWORDS. After that, you don’t need to go to Google Ads and make any changes. All selected keywords will be stopped automatically.
 Here is how you can stop ineffective keywords
7 Ways to Find the Best PPC Keywords [Guide to PPC Keyword Research]
So, we’ve highlighted two automated PromoNavi tools and have saved a good amount of money. But we still have two more tools, and the savings will be even more impressive.
Ready? Let’s move on.
#3: Set up Device Bid Adjustments
While running your ads, you’ve probably noticed that traffic from some devices drives more conversions (and they are cheaper). To stop wasting money, you should reduce bids for device types with poor performance, as well as increase bids for high-performing ones.
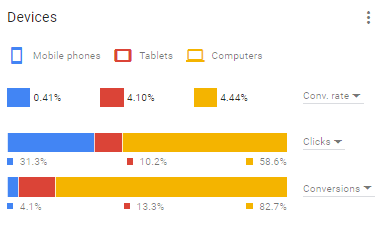 PPC performance may significantly vary across devices
In Google Ads, you can adjust bids at the campaign or ad group level. To set these adjustments, go to “Devices” and set the percentage of bid adjustment. The available devices are desktop computers, mobile phones, tablets, and TV screens.
 The adjustment level -100% means that the device isn’t used at all
In the “Devices” report, you can correct bids and get useful data for adjustments. For example, metrics such as Conversions, Cost per Conversion, and Conversion Rate will come in handy.
How to use device bid adjustments properly:
- Don’t immediately set a big adjustment. It’s better to move step-by-step. For example, set a -10% adjustment and monitor the related metrics. If the result satisfies you, stop correcting. Otherwise, set a higher adjustment.
- Remember cross-device activity. For example, a user gets to know your brand from a mobile phone. Later, he places an order from his computer. Too-strict adjustments for mobiles could cause a lack of impressions, and the user might not see your ad. To solve the problem, you should set up cross-device tracking.
- Take into account behavior metrics. It’s not only conversions that determine the decision to set bid adjustments. Also, consider metrics like Average Time on Site (Avg. Time) and Percentage of Site Exits (% Exit). Good behavior metrics mean that users are interested in your product and potentially can become your clients.
How to automate the device bid adjustment
You probably thought about Smart Bidding. Indeed, it’s an easy-go way to fully automate your PPC campaigns. However, many PPC specialists are still managing their campaigns manually, preferring to have more control.
Whatever it was, if you adjust bids manually, you will need a reliable automated advisor. The PromoNavi’s Device Bid Adjustment tool will be in handy here.
The tool contains two bid adjustment reports:
- By traffic. Recommendations are based on user behavior metrics like Average Time on Site (Avg. Time) and Percentage of Site Exits (% Exit).
- By goals. Recommendations are based on conversion metrics: Conversions, Conversion Rate, Conversion Cost, etc.
The tool recommends increasing campaign-based bids for devices that show good behavior/conversion metrics. Otherwise, the tool recommends decreasing your bids. This helps you save your budget easily.
The tool tracks these metrics daily, but you’ll receive the new recommendations no more than once every 3 days.
Notice! The bid adjustment recommendations are not obligatory; rather, you get a summary report on the important metrics by device type. The report allows you to manage bids directly from the PromoNavi interface. You can set the bid adjustments depending on your marketing goals.
How to set the device bid adjustments
Sign up or log into PromoNavi and, in the “Campaigns Optimization” section, select the Device Bid Adjustment tool.
You can get recommendations by traffic or by conversion goals.
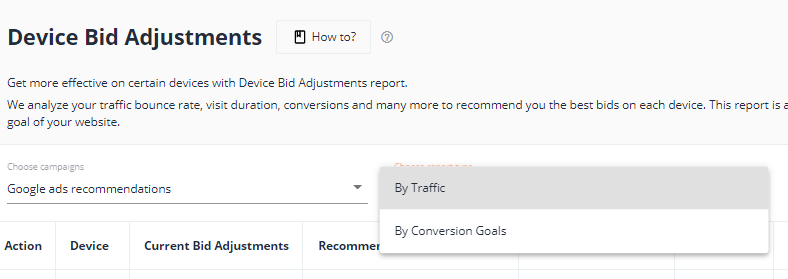 Choose the report type
If you choose to see the recommendations report by conversion goals, select the goals for which you would like to get recommendations.
 By default, the system shows a report considering all the goals for selected campaigns
The table that will show up contains metrics for each device type. These metrics are Impressions, Clicks, Cost, CPC, Avg. Time and % Exit. The table also shows 3 columns with indicators: Current Bid Adjustments, Recommended Bid Adjustments, and Expected Outcome.
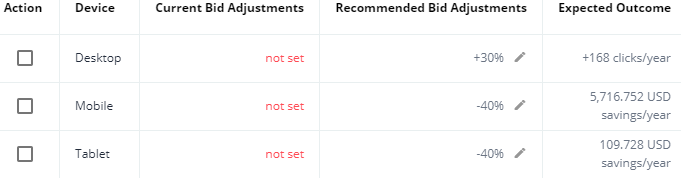 The table with recommended bid adjustments and key metrics
Recommended bid adjustments are set by percentages in the Recommended Bid Adjustments column.
 To edit the recommended adjustment, click the pencil icon
To apply these bid adjustments to your campaign, tick the device types in the table and press the ACCEPT NEW BIDS button. The system will perform changes to your Google Ads campaign automatically.
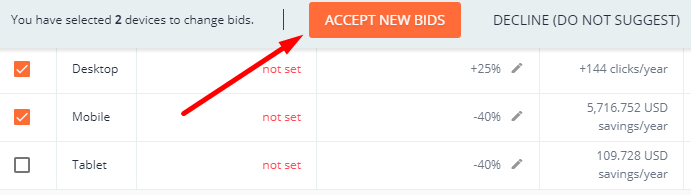 Accept or decline chosen bid adjustments
In this example, the total potential savings are only $5,826.48/year. Additionally, we can get +144 clicks/year if we increase bids for Desktop. You can find even more ways of increasing Google Ads traffic here.
#4: Adjust Bids by Targeted Locations
The location bid adjustments work on a similar principle as the device bid adjustments. The difference is that, instead of devices, you set bid adjustments for targeted locations. Moreover, the location bid adjustments are available only on a campaign level.
To set location bid adjustments in Google Ads, choose the campaign, go to “Locations” / “Targeted,” and set the percentage of bid adjustment (from -90% to +900%).
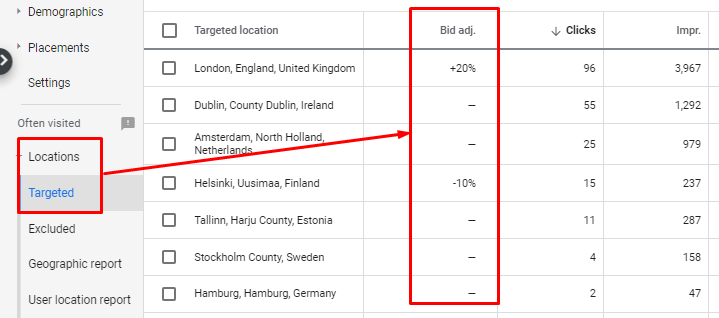 Location bid adjustments in Google Ads
How to automate location bid adjustments
Use PromoNavi’s Location Bid Adjustments tool. The tool recommends bid adjustments for specific geographic locations. Recommendations are available for all site traffic and for specific goals.
Recommended bid adjustments are set by percentages in the Recommended Bid Adjustments column.
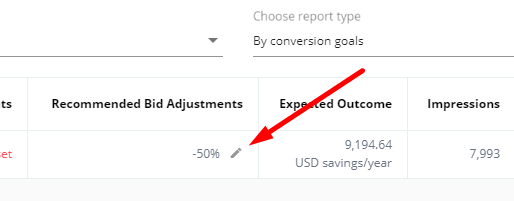 You can edit the recommended adjustment by clicking the pencil icon
In the Expected Outcome column, the potential annual savings are listed. In the example above, decreasing the bid adjustment by 50% leads to $9,194.64 savings a year!
To apply these bid adjustments to your campaign, tick the geographic locations in the table and press the ACCEPT NEW BIDS button.
Wrapping up
Now you know 4 ways to save on your ad budget. They are:
- Adding negative keywords to ad groups to stop wasting your budget on “empty” clicks.
- Stop keywords with poor performance metrics.
- Increasing/decreasing bids for devices that show good/poor performance metrics.
- Using location bid adjustments for locations that show good/poor performance metrics.
Our PromoNavi recommendation tools enable you to efficiently work in all these directions. You don’t need to manually monitor metrics and continuously make changes to your Google Ads account one by one. Just connect your account to PromoNavi, and you’ll get all the necessary recommendations. It works directly with Google Ads, where those changes to your account will be performed automatically.