There are no perfect Google Ads campaigns. You can always fix something to get more clicks.
The good news is you don’t need to waste time increasing your Google Ads traffic. We’ll show you how to easily do that using PromoNavi automation tools.
3 Ways to Drive More Google Ads Clicks
To get more clicks, you can:
- Find more keywords. Every additional keyword increases cumulative search volume and expands the number of relevant search queries. So, your ads receive more impressions and clicks.
- Remove conflicting negative keywords. You may have enough keywords, but some of them are being blocked by negative keywords, so you aren’t able to maximize clicks. The decision is to remove conflicting negative keywords.
- Optimize ads. If you identify low-performing ads and improve them, you will increase their Quality Score and Ad Rank. Well-optimized ads commonly drive more traffic on a lower CPC.
All in all, we’ve got 3 ways to get more Google Ads clicks. Let’s delve into each technique.
1. Expand Your Keywords List
Frequently, to find new keywords, advertisers use Google Keyword Planner. That is a common practice, but not without its problems: you can’t know in advance if your chosen keywords are effective. You have to start “field trials” to know which keywords drive more traffic and conversions at a lower cost.
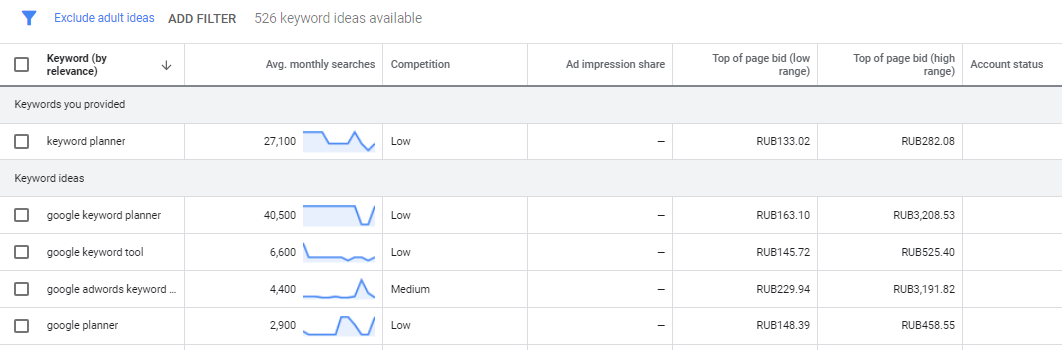 With Google Keyword Planner, you only know average monthly searches and top of page bid (low/high)
An alternative source of new keywords is the Google Ads Search Terms report.
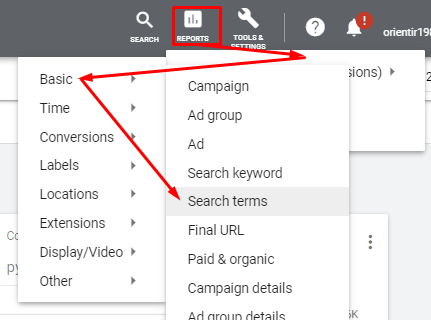 To find the report, go to Reports / Predefined reports (Dimensions) / Basic / Search terms
The Search terms report contains search terms with performance metrics: Clicks, Impressions, CTR, CPC, etc.
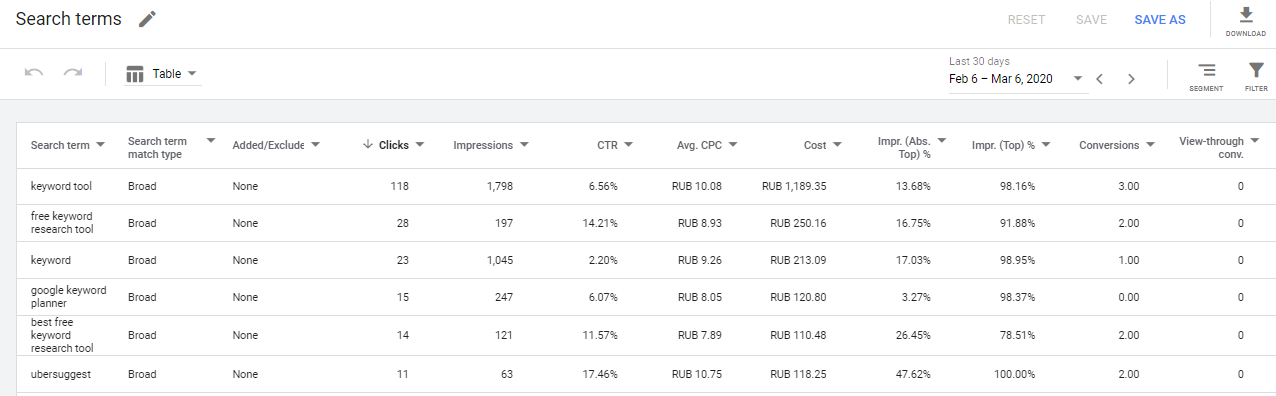 A sample of the Google Ads Search terms report
There are two issues with this report:
1. It doesn’t contain behavior metrics, such as Average Time on Site or % Exit. But they are still crucial for understanding keyword performance.
To handle this issue, you need to link your Google Analytics account to Google Ads. Then, go to Google Analytics and open the Google Ads Search Queries report. Behavior metrics are available there, as well as performance metrics.
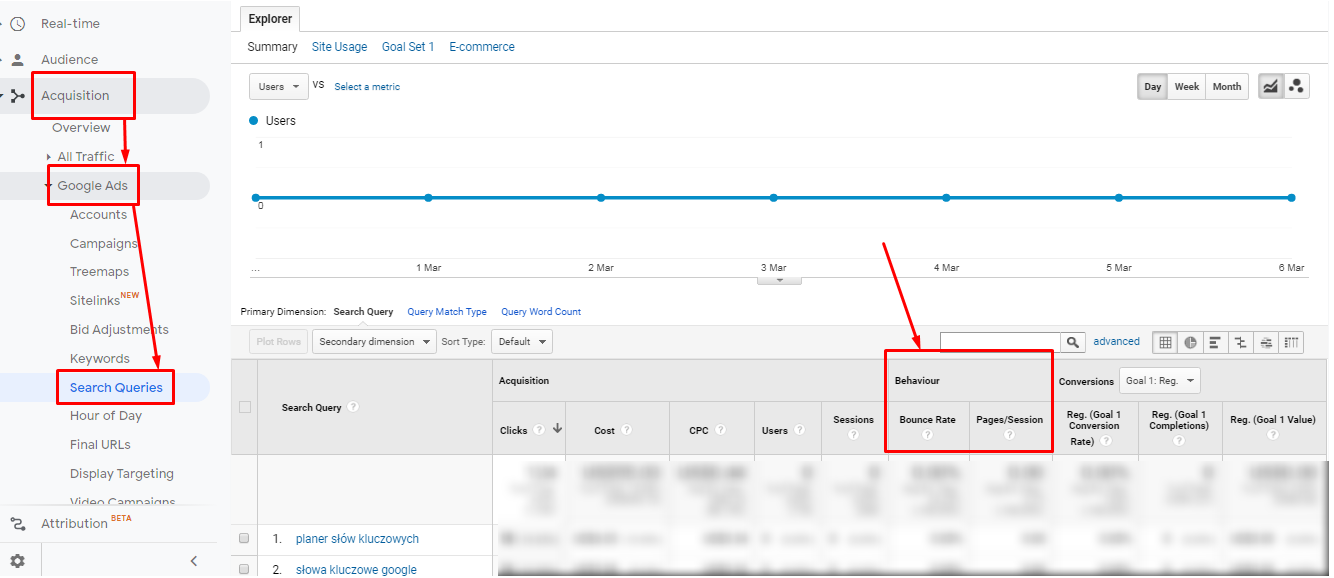 Behavior metrics in the Google Analytics Search Queries report
2. One more challenge is choosing search queries and adding them to your Google Ads campaign manually—it’s a waste of time!
To fix these issues, link your Google Ads account to PromoNavi and use the Expand Your Keyword List tool.
The tool’s main features are:
- Search queries reporting with both performance and behavior metrics.
- The ability to use filters to find new effective keywords.
- Automatic identification of relevant ad groups for each keyword, so you don’t have to do that manually.
- The tool automatically adds selected keywords to your Google Ads campaign.
Let’s see how it works.
Go to PromoNavi, create an account or log in, and link your Google Ads account.
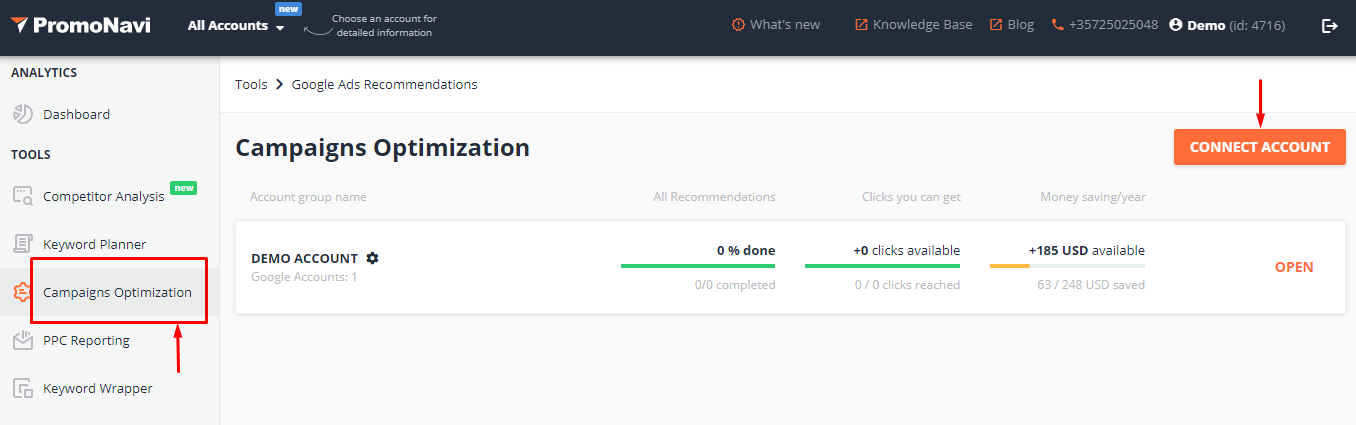 In the “Campaigns Optimization” section, you can link your Google Ads account
5-10 minutes after connecting your Google Ads account, you’ll see daily recommendations on how to improve your campaigns.
The total ad spend, as well as the amount of potential savings and clicks, are available for you. The chart shows impressions and clicks changes.
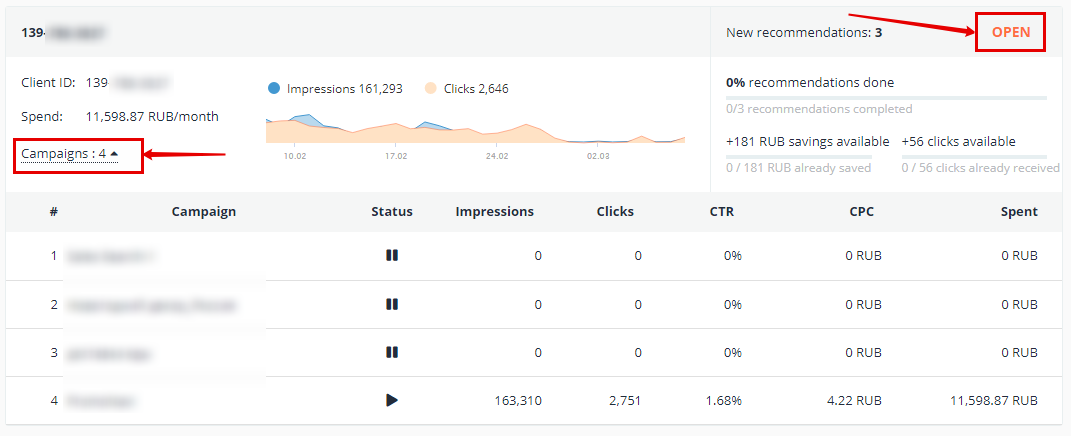 Click “Campaigns” to open metrics for your campaigns; click “Open” to go to recommendations
Sometimes the tool doesn’t suggest any new keywords because the campaign doesn’t have enough data. Or, the Google Analytics account is not connected, in which case you’ll see the error “Fix Google Analytics problems.”
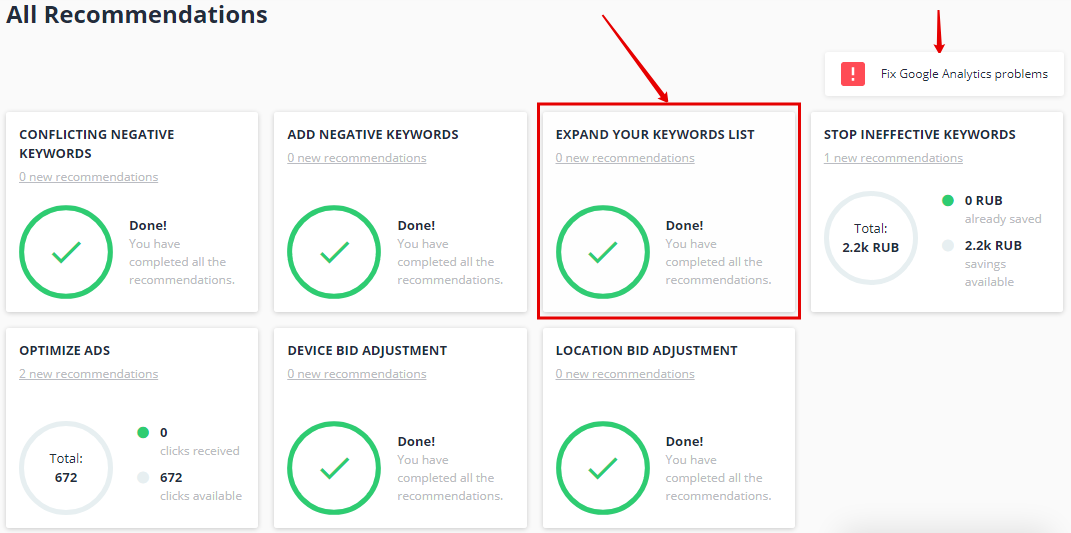 Click the error to fix the problem
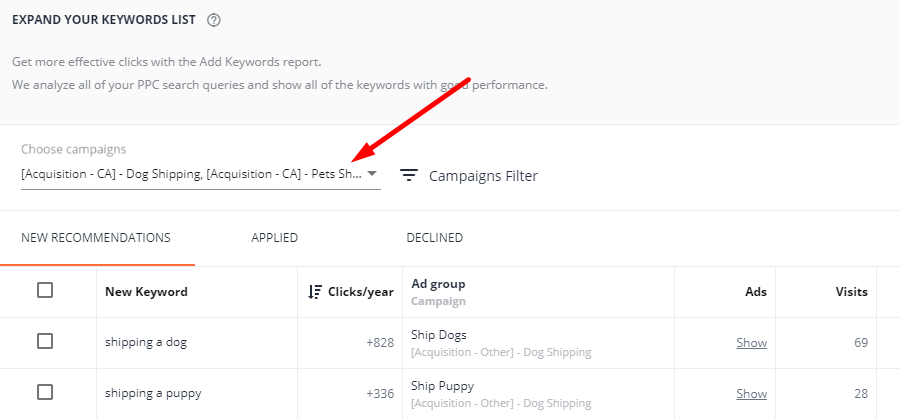
When both Google Ads and Google Analytics accounts are connected, the tool’s recommendations become available. Click the “Expand Your Keyword List” section to display the new keywords.
 Choose the campaigns for which you want to get keyword recommendations
The tool finds relevant keywords that can bring you additional traffic. The total amount of potential clicks (per year) is displayed in the top right corner.
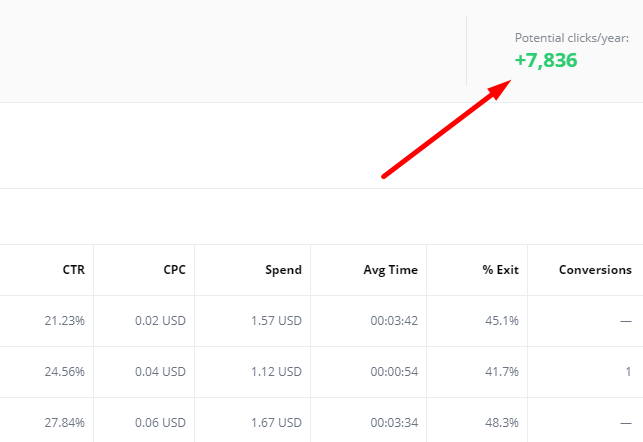 This example shows the potential 7,836 increase in clicks
The table contains metrics for each suggested keyword: Visits, Impressions, CTR, CPC, Spend, Avg Time, % Exit, Conversions. The source of data is Google Ads and Google Analytics from the last 30 days.
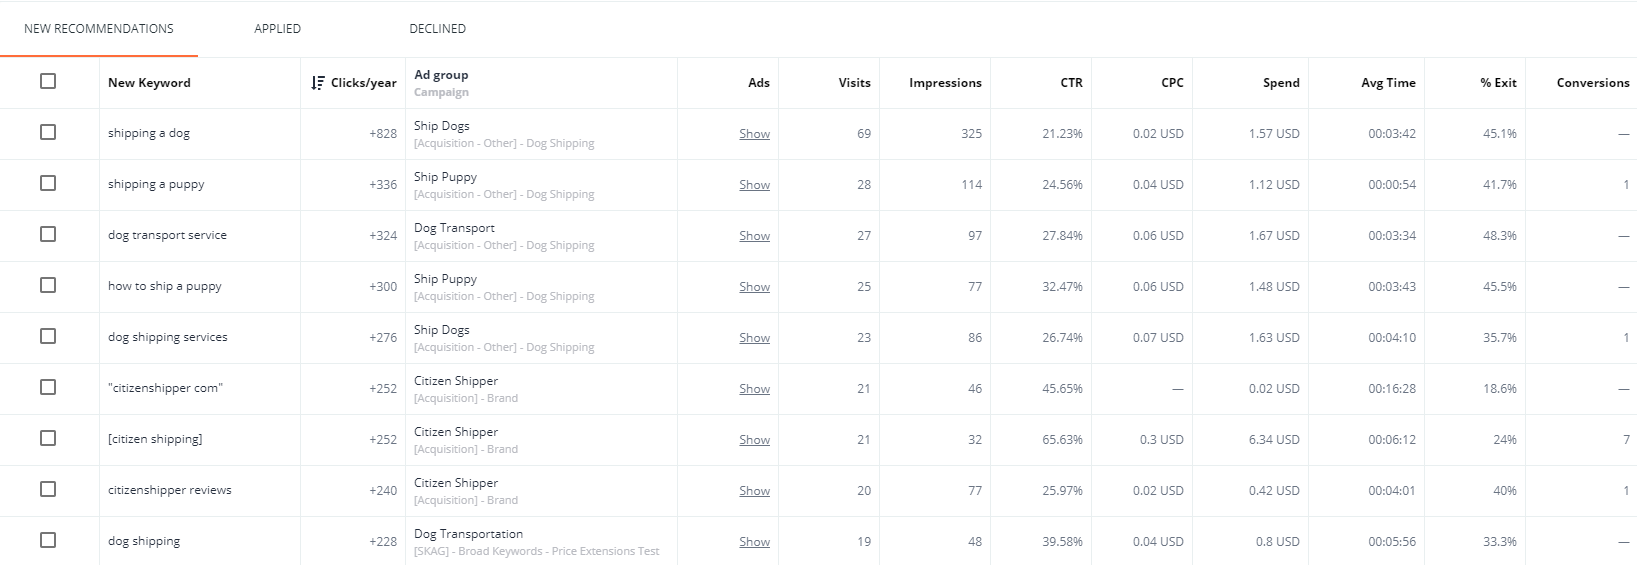 A sample of the table with recommended keywords
You can filter keywords by different metrics: Visits, Impressions, CTR, CPC, etc. But remember that too strict filtering reduces the number of suitable keywords.
 In most cases, 1-2 filtering conditions are enough to choose effective keywords
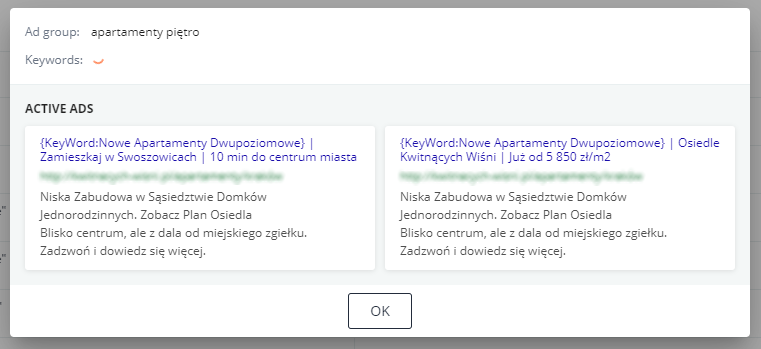
Click “Show” in the “Ads” column to see all the ads that will run with the current keyword.
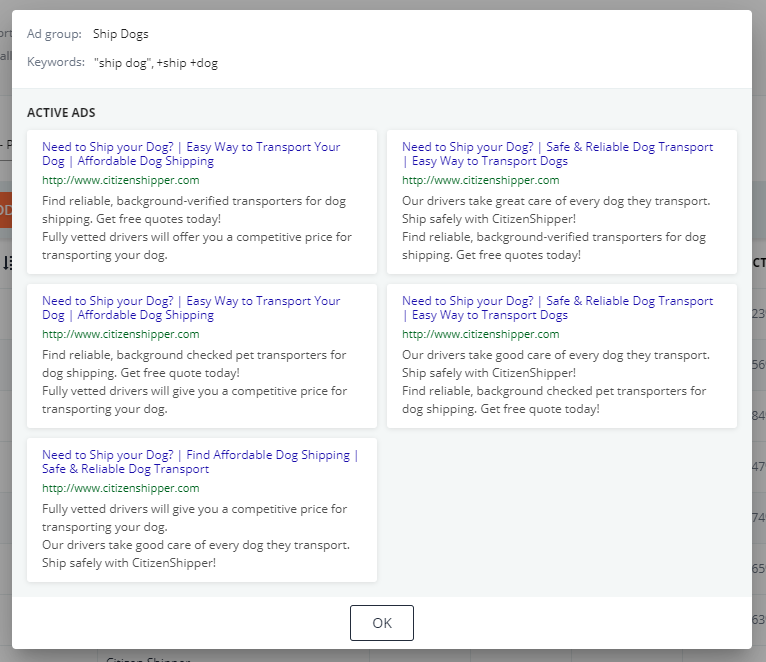 You can see all the ads that will run with the current keyword
To add keywords to the campaign, tick/select them and press the “Add to Google Ads” button. The tool adds these keywords to the ad groups from the “Ad Group” column. The system will automatically perform the changes to your Google Ads campaign.
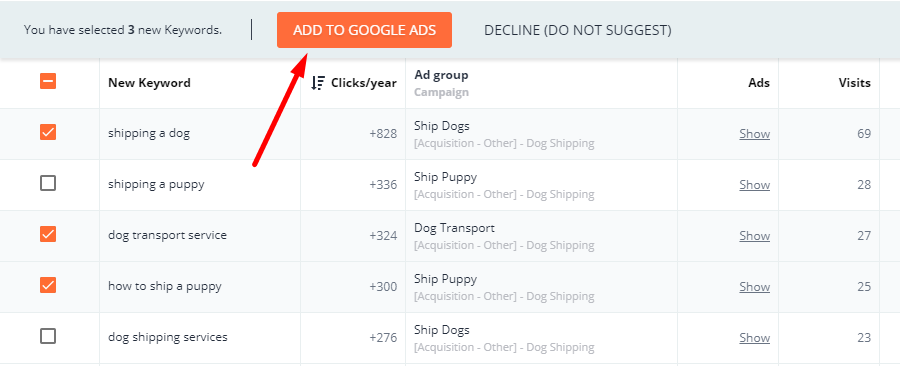 Don’t forget to tick keywords you want to add to your campaign
Besides the “New Recommendations” tab, there are two more tabs:
- “Applied” — the list of keywords already added to a campaign;
- “Declined” — the list of keywords already declined.
This way, the Expand Your Keyword List tool lets you easily find new keywords and add them to your campaign.
Two more PromoNavi recommendation tools can increase the number of clicks. Let’s continue our overview.
7 Ways to Find the Best PPC Keywords [Guide to PPC Keyword Research]
2. Remove Conflicting Negative Keywords
Negative keywords prevent ads from showing up for irrelevant search queries. But sometimes, they block normal keywords from matching relevant search queries: this makes your campaigns less efficient.
Why do negative keywords conflict with normal keywords?
1. Negative keywords could have a broader match type than normal keywords.
Example. We are interested in users searching for a free demo version of CMS, but not a free CMS. So, we add the keyword “CMS free demo” and the negative keyword “free CMS.” What happens in this case? The broad match negative keyword “free CMS” blocks the normal keyword “CMS free demo.” The decision is to use an exact match instead of a broad match. Thereby, the negative keyword “[free CMS]” will block only irrelevant search queries.
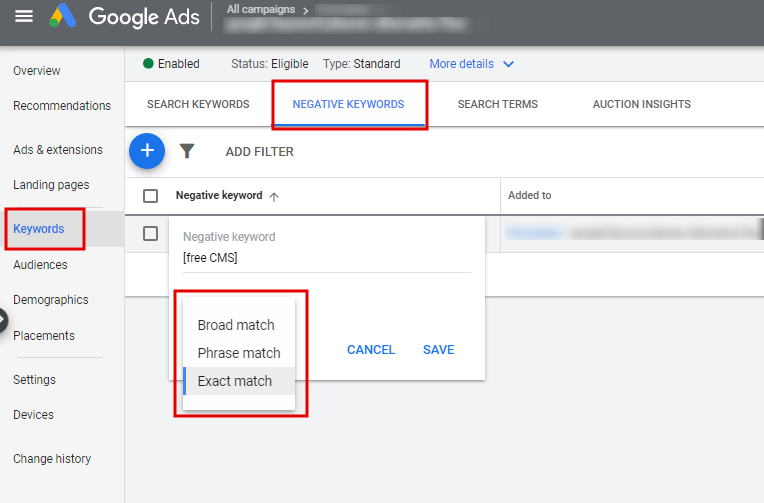 Changing negative keyword match type in the Google Ads interface
2. Conflicts may arise because of campaign-level negative keywords.
Example. We are running ads for a PromoNavi Keyword Planner tool. To avoid the competitor’s search term “keyword tool io” we are adding it as a negative keyword at the campaign level. Later, we decided to test the new ad with two headlines: “PromoNavi Keyword Tool” and “Better Than Keywordtool io.” The search term “keyword tool io” is relevant for the tested ad, but it is blocked at the campaign level.
No matter the reason, if you want to fix keyword conflicts, you should identify them first, and PromoNavi’s Conflicting Negative Keywords tool will be able to handle it.
The tool finds negative keywords that block normal keywords from matching relevant search queries. Remove these negative keywords, and your campaign becomes more effective.
The tool is available in the “Campaigns Optimization” section.
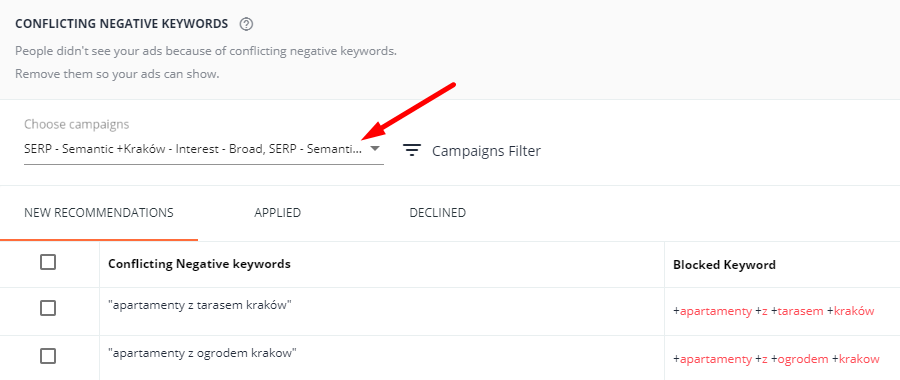
 Сhoose the campaigns for which you want to get conflicting negative keywords
There are negative keywords in the table and blocked normal keywords and the associated ad groups.
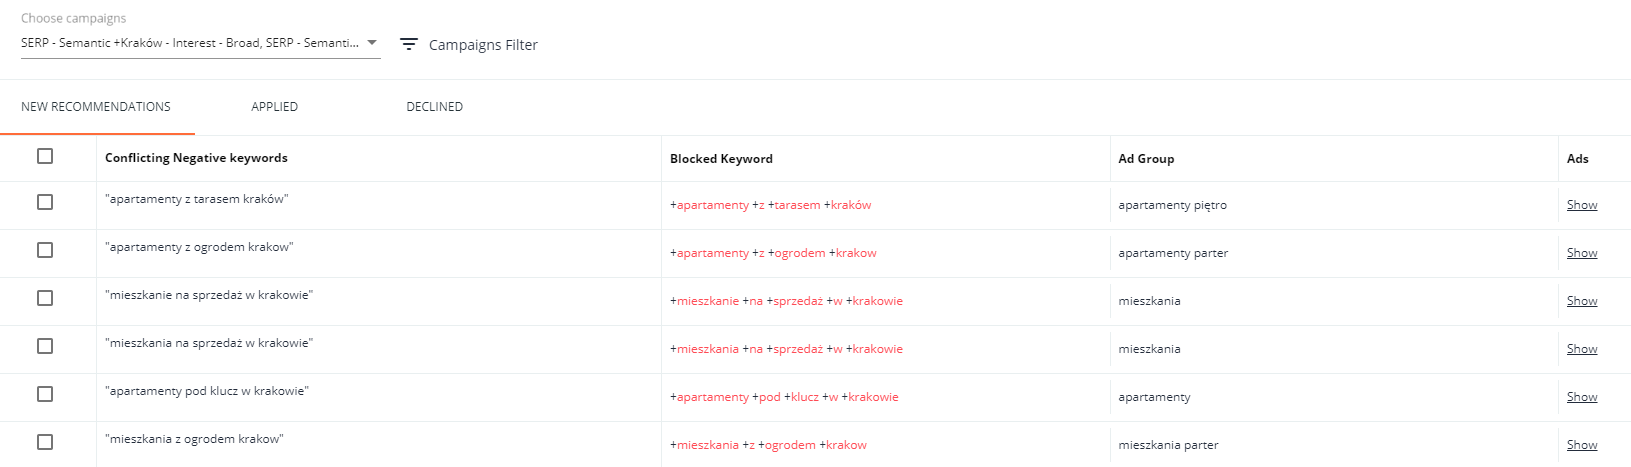 An example of the table with the blocked keywords and corresponding negatives
Click “Show” in the “Ads” column to see the blocked ads.
 Look through these ads to decide whether you want to unblock them
To unblock the ads, remove the corresponding negative keywords. Tick or select the relevant negative keywords and press the “Remove Negative Keywords” button. The changes to your Google Ads campaign will be performed automatically.
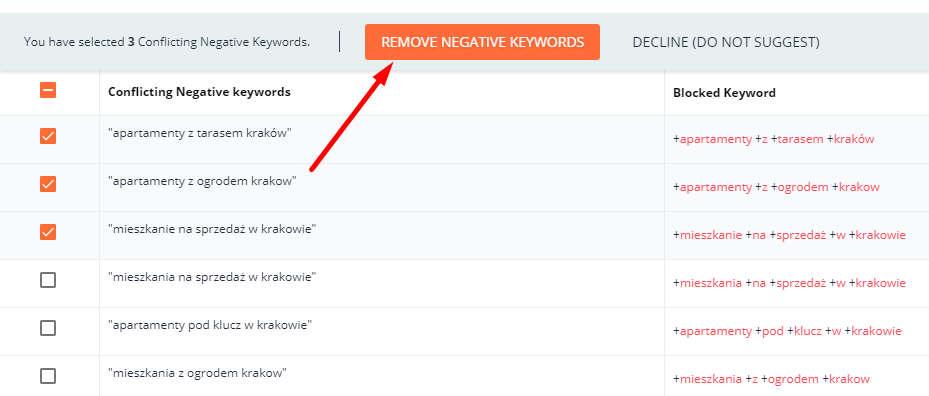 Don’t forget to tick keywords to unblock them
As a result, your Google Ads campaign becomes free of negative keyword conflicts and drives more traffic.
If you don’t want to delete some of the suggested negative keywords and would like to stop getting recommendations for them, tick the checkboxes next to those keywords and press “Decline (Do Not Suggest).”
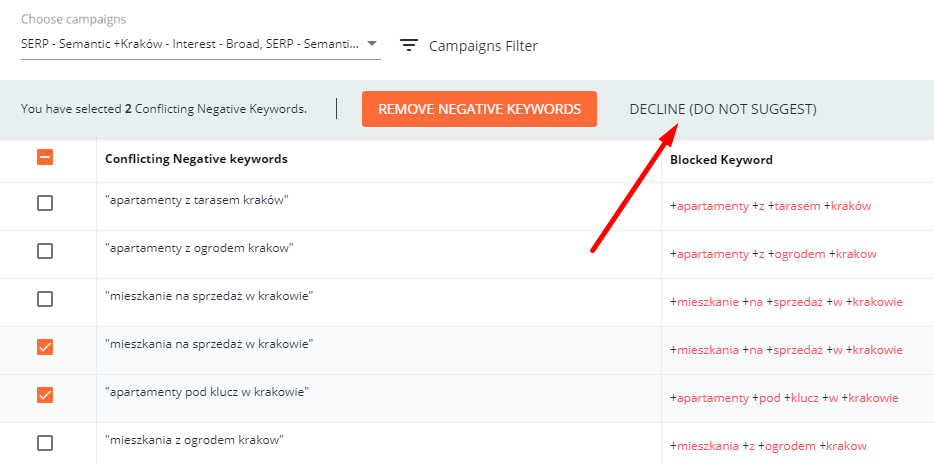 The declined keywords will be still available to you on the “Declined” tab
3. Optimize Your Ads
An ad’s position on the Google search results page depends on the bid level and Quality Score. So, if you want to get more clicks on the same budget, you should increase your Quality Score rather than a bid.
The Quality Score is reported on a 1-10 scale and includes three components: expected CTR, ad relevance, and landing page experience.
Here are five tips to make ads more relevant:
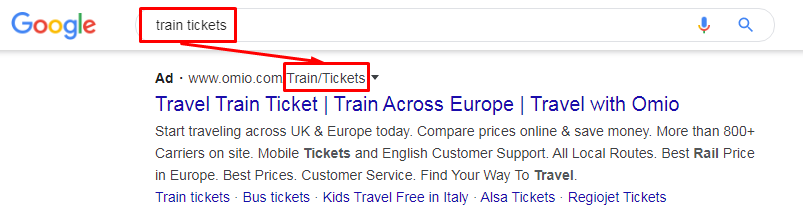
1. Add keywords in the ad headlines. The headline is the most important ad asset, so it must be extremely relevant to the search query.
 In this example, the keyword phrase exactly matches the part of the first headline
2. Add keywords in the path. This helps users to understand that the page is really relevant to the request.
 In this example, the keyword phrase exactly matches the path
3. Make use of the third headline. Three headlines attract more attention and drive more clicks.
 If you’re frustrated with creating the third headlines, just write there your domain name
4. Use both available descriptions. The “fatter” or more dense your ads are, the more informative and noticeable they are.
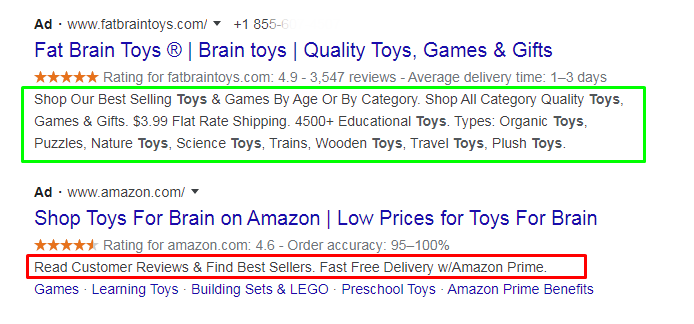 More text in the ad makes it more noticeable
5. Capitalize the first letters in headlines. This makes headlines significant and will drive more clicks.
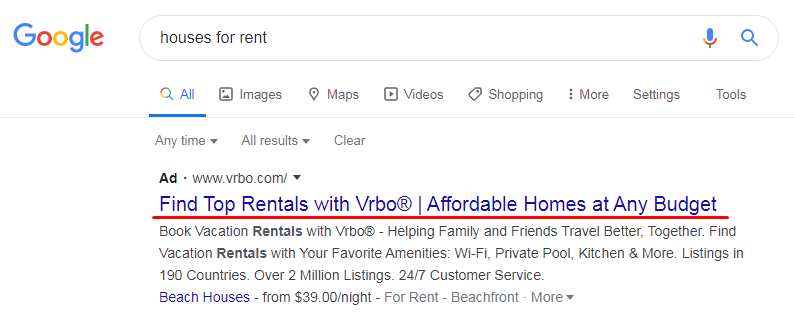 Capitalized letters makes an ad more attractive
To check your ads for optimization, you can use PromoNavi’s Optimize Ads tool. This tool analyzes your ads and recommends ways to increase their CTR.
The tool is available in the “Campaigns Optimization” section. Firstly, choose the campaigns for which you want to get ad recommendations.
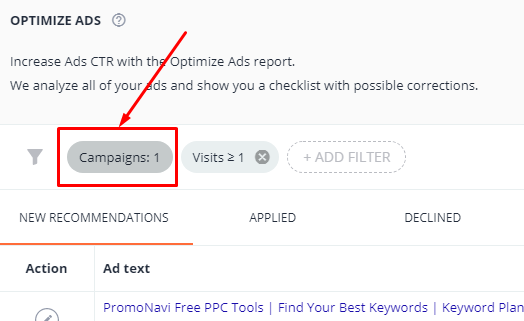 Click the “Campaigns” and select one or several Google Ads campaigns
The list of ads is presented in a table. The potential amount of clicks (per year) is displayed in the top right corner. That’s how many more clicks you can get by improving your ads.
For every ad in the table, you can see the number of recommendations and potential clicks.
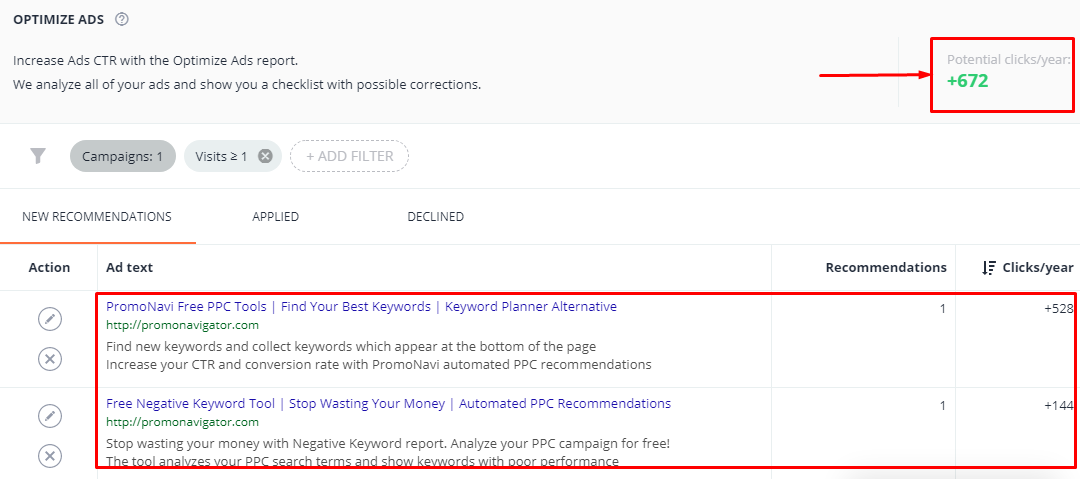 In the example, the potential increase in clicks is 672
Now, you can view recommendations for specific ads.
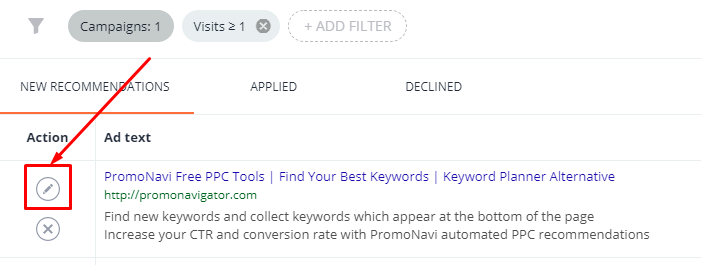 To display recommendations, click on the pencil icon to the left
In a drop-down window, you’ll find the ad text displayed (1) and the recommended changes you should make (2). The name of the ad group and keywords are displayed at the top of the window.
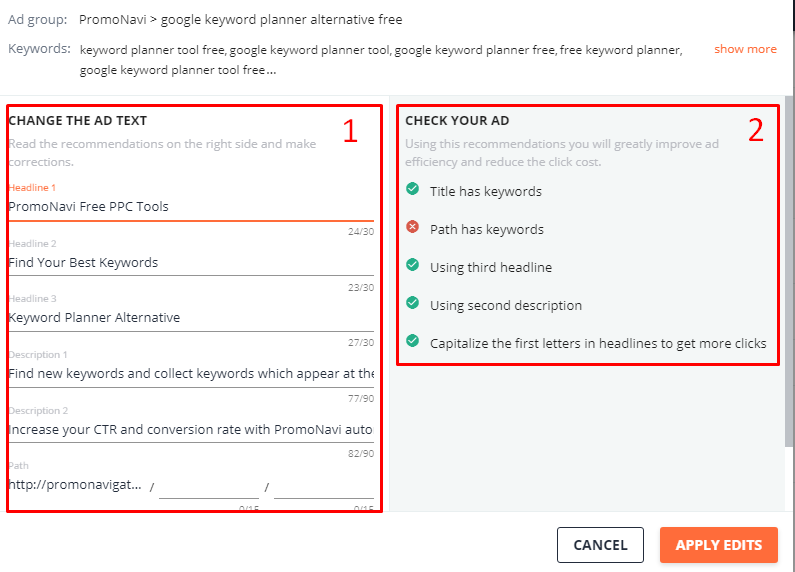 Not implemented recommendations are marked in the red “x” icon
Let’s accept the recommended change: to add keywords in the Path. After the changes are done, take a look at the recommendations list. All the items should be marked with a green checkmark. This means that everything is done correctly. Now, press the “Apply Edits” button to save changes.
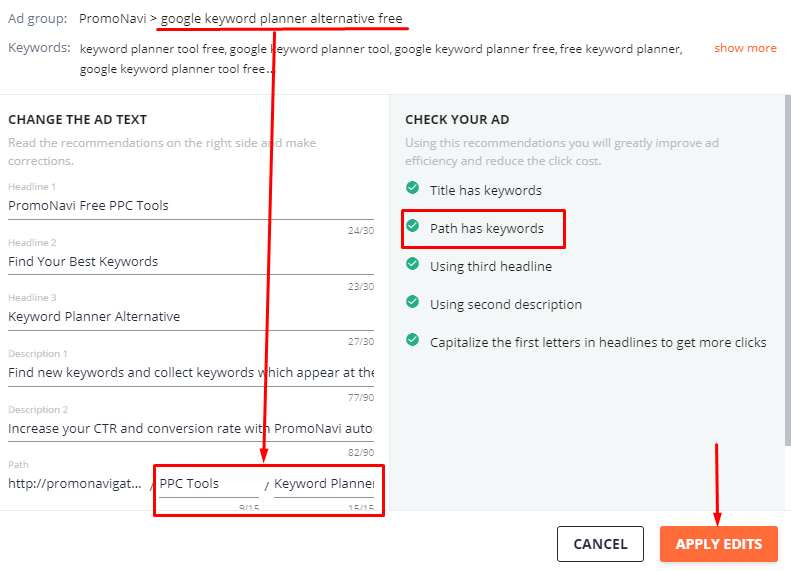 After we’ve entered keyword in the path, all the recommendations become implemented
If you don’t want to follow the recommendation to change the ad text, click the “x” icon.
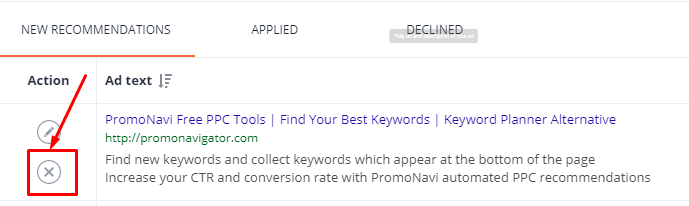 The declined ad moves to the “Declined” tab, from where you can recover it if needed
Note that all changes to your Google Ads account are performed automatically.
To Wrap Up
Now you know three ways to increase the number of your clicks. They are:
1. Expanding the keyword list with keywords that have good performance and acquisition metrics.
2. Removing conflicts between negative keywords and normal keywords by deleting negative keywords that are blocking your ads.
3. Optimizing ads with five key ad content tips to make them more relevant, noticeable, and clickable.
With PromoNavi, you can avoid routine work. Just link your Google Ads and Google Analytics account to PromoNavi, and you’ll be able to receive and perform recommendations automatically. Moreover, you’ll get access to various PPC automation tools, such as Keyword Planner, PPC Reporting, Account Alerts, Competitor Analysis, and others. They will save you time and give you more control over your PPC campaigns.