Customizing ads for specific users with their search intentions is an effective strategy but time-consuming—if you do everything manually. However, you can automate ads’ creation and personalization using dynamic text. It includes dynamic keyword insertion, IF function, countdown timer, and customization based on a pre-loaded dataset. We’ll show you how to apply each tool.
Quick Links
What is Сustomized Text, and How is It Useful?
5 Examples of Using Dynamic Text
#1: Drive Different Call to Actions for Mobile and Desktop Users
#2: Adapt Offers to Different Audiences
#3: Increase Ad Relevance With Dynamic Keyword Insertion
#4: Motivate to Place an Order Using Countdowns
#5: Show the Product Name and Price in the Headline
What is Dynamic Text Text, and How is It Useful?
In Google Ads, you don’t have to create each ad manually. There are at least five ways to automate ad copy creation, and using customized text is one of them.
When you set up dynamic text, the system inserts one or more parameters in the ad. These are product name, search query, availability, price, etc. As a result, your ads are customized for each search query, and you get a variety of ads from a single template.
For example, users in New York will see the text “Free delivery in NY,” and in Washington—”Delivery to Washington $10.”
Why you should set up customized ads:
- They increase ad relevance and CTR. If a search query appears in the ad text, it makes the ad more relevant to the user’s intention.
- They keep ads up-to-date. The data on prices, availability, and discounts are taken from the feed linked to your CRM.
- They increase the conversion rate. For example, a countdown timer in the ad motivates customers to make an order sooner.
What you need to know before setting up customized text:
- This feature is available only for Search campaigns.
- Dynamic text can be placed only in the title and/or description (not in the displayed URL and extensions).
- After you add a customized text to an ad, the ad’s insights are not reset.
There are four types of dynamic text:
- Dynamic keyword insertion
- IF function
- Countdown
- Ad customizer based on pre-loaded data
Now, we’ll show you how to set up ads with dynamic text.
5 Examples of Using Dynamic Text
#1: Drive Different Call to Actions for Mobile and Desktop Users
In most cases, desktop users tend to go to the website and fill out an application form; mobile users prefer to call (it is more convenient than filling out a form). Use this trait when displaying ads: encourage mobile users to call and desktop users—to visit your website.
How to set it up
You should create an ad or edit an existing one and place an open brace ({) where the call to action will be. In our example, this is Headline 1. From a drop-down, let’s select the IF function.
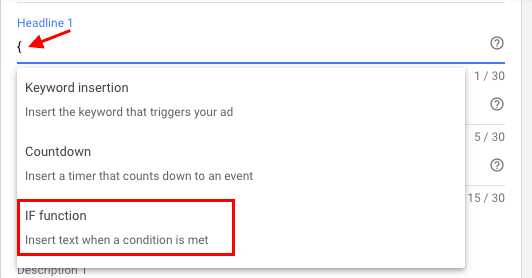 IF function insert text when a condition is met
Enter the text that users will see depending on the device type:
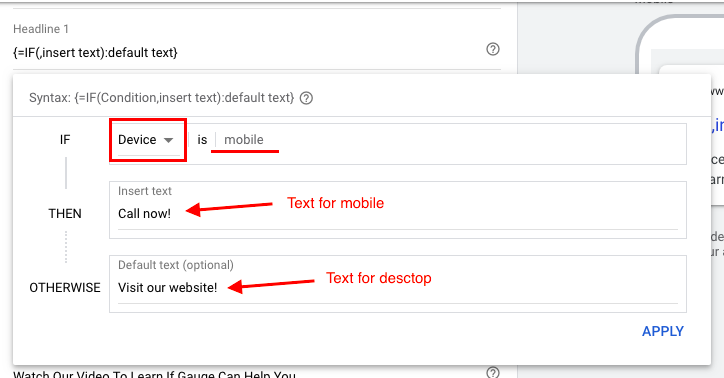 Texts for mobile and desktops should be different
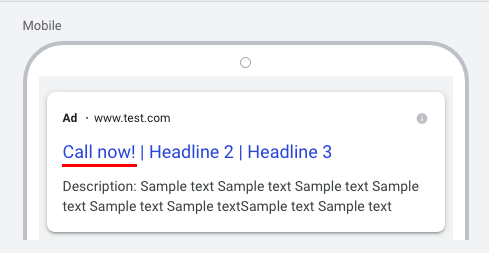
After that, the following headline will show on mobile devices:
Desktop users will see another headline:
You can test different text versions in the existing ad. The insights for the previous time will remain, so you will see the impact of changes you make.
Diving into Automated Rules in Google Ads [10 Real-Life Examples]
#2: Adapt Offers to Different Audiences
Let’s say your goal is to return users who have added an item to the cart but have not placed an order; for this purpose, you will show these users ads with additional discounts. The best way to set up such ads is to use the IF function.
First, from the audiences list, select the category “Users who have not completed the purchase.” In the “THEN” line, enter the text and the amount of discount for this audience. In the “OTHERWISE” line, set the text for other users. Click “Apply.”
In this example, users who have not completed the purchase will see this ad:
 An example of a headline with a special offer
Other users will see a different ad with a regular discount:
 These headlines will see other users
#3: Increase Ad Relevance With Dynamic Keyword Insertion
When users see a search query in the ad’s headline, they find this ad particularly relevant. That’s why PPC managers usually try to include the main keywords in the headlines and/or descriptions.
Creating ads for all the keywords can be time-consuming, but you don’t have to do it manually. Use dynamic keyword insertion, and the system will update your ad texts to include keywords that match the users’ search terms.
How to set up dynamic keyword insertion
When you’re entering an ad headline or description, type a brace ({) and select “Keyword insertion” from the drop-down.
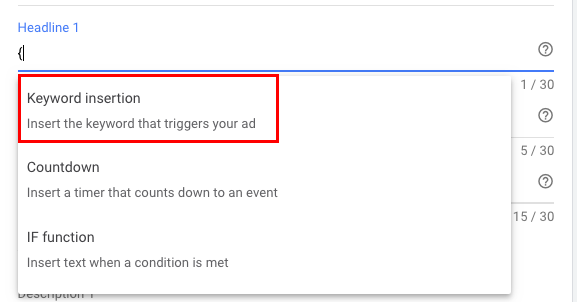 A drop-down with Dynamic Text options
That’s how the set-up window looks like:
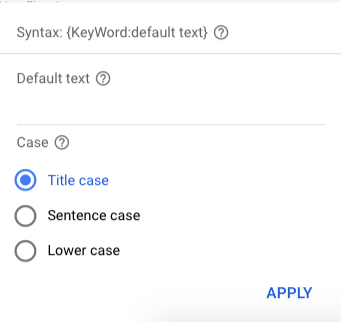 A set-up window for keyword insertion
In the “Default text” line, enter the text that best matches the keywords in the ad group. For example, for our group, the keywords are “orthopedic mattress” and “memory foam mattress.” In this case, we enter “mattresses” as the default text. We place keyword insertion in Headline 1 and the CTA “Shop Now!” as Headline 2.
After that, the ad will adapt to the users’ requests in the way shown in the table below:
| User request | The headline that users will see |
|---|---|
| orthopedic mattresses | Orthopedic Mattresses | Shop Now! |
| memory foam mattresses | Memory Foam Mattresses | Shop Now! |
| pocket sprung mattresses | Pocket Sprung Mattresses | Shop Now! |
If the user request is too long to fit into the 30-character limit, the system uses the default word. For example, if the query is “cheap pocket sprung mattresses in Washington DC,” the headline “Mattresses | Shop Now!” will show. Also, the default text will appear if the system fails to find a keyword matching the query.
#4: Motivate to Place an Order Using Countdowns
You can set a countdown in your ad headline or description. Users will see the dates for the start of the event or the end of the promotion.
As an example, let’s set up a countdown to the end of the promotion. We’ll add it to the second headline after the words “Deal ends in:”
 Choose “Countdown” from a drop-down
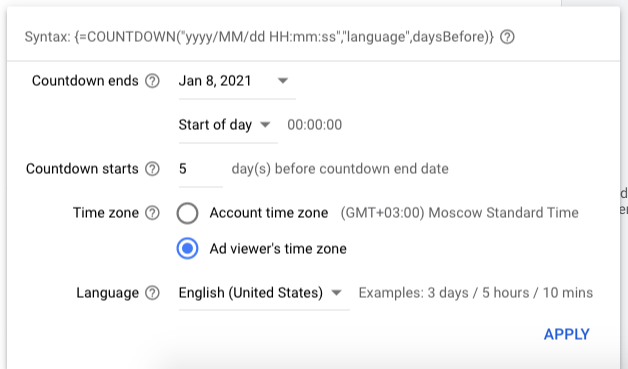
Enter the date and time of the countdown, set the countdown period, set the time zone, and the language in which the date and time will be displayed. For ads in different time zones, it’s best to set the user’s time zone.
An ad with a countdown will look like this:
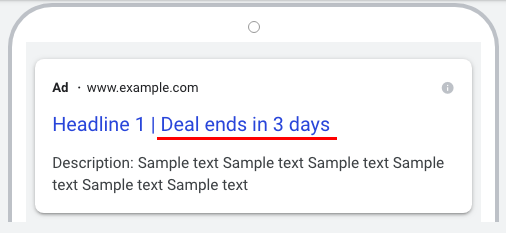 An example of an ad with a countdown
As you get closer to the date, the number in the ad will also change (3 days, 2 days, 10 hours, 20 minutes, etc.)
#5: Show the Product Name and Price in the Headline
Let’s say that your goal is to display the exact product name and price in the ad headline if a user is looking for a specific model. To do this, you need to create a dataset and upload it to your Google Ads account.
Let’s start by creating a dataset.
Define attributes
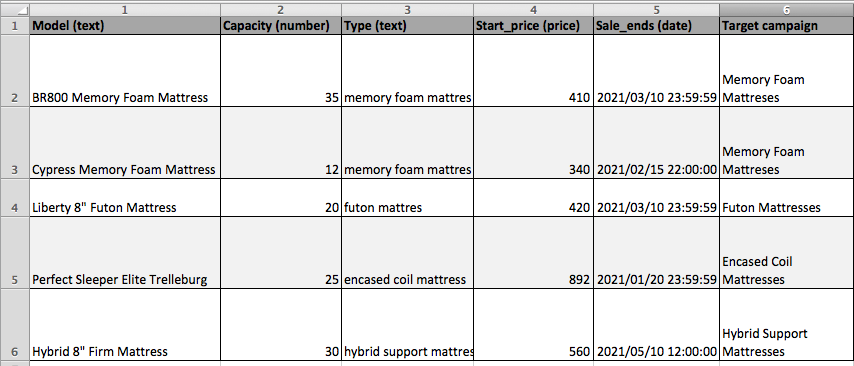
Download this template and enter the customizer data into the XLS file.
First, you need to set up custom attributes—this is the data that will be substituted in ads. In columns A-E, change the custom attributes to your data. Delete the columns you don’t need. Do not put spaces in attribute names.
Specify attribute types for each column:
- Text: product name (letters, numbers, symbols)
- Number: inventory count (whole numbers)
- Price: cost (аny number, including decimals) and currency characters)
- Date: timestamp (yyyy/MM/dd hh:mm:ss)
Besides these four, there are other standard attributes. For example, you can specify preferred devices, scheduling, etc.
That is how a filled-out file looks like:
Set up targeting
In columns F-H of the template, indicate additional targeting settings. These are the default targeting parameters:
- Target campaign. Specify the campaign this row’s data should be used for.
- Target ad group. Set the ad group this row’s data should be used for.
- Target keyword. Enter the keyword that should trigger this row. You can apply match types to your keywords.
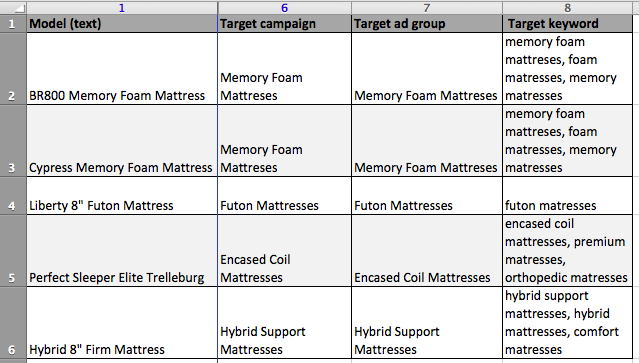 Targeting settings in the feed
If you work in multiple regions, you can use targeting attributes to set up location targeting. Google identifies the user’s IP and substitutes the region in the headline.
To set up, add a column with the Target location attribute to the dataset table.
The use of targeting attributes is not limited to locations. For example, you can specify the type of targeting that applies to locations (Target location restriction), specify the match type of match for the keyword (Target keyword match type), and so on.
To learn more about location dynamic insertion and the opportunities it drives to, read on our post—Advanced Dynamic Location Insertion in Google Ads.
Upload your file to your Google Ads account
Save your file in a .csv, .tsv, .xls, or .xlsx format. Use .xls or .xlsx for files under 50 MB, and .csv or .tsv for files up to 500 MB.
Log into your account, go to “Tools,” and select “Business data.”
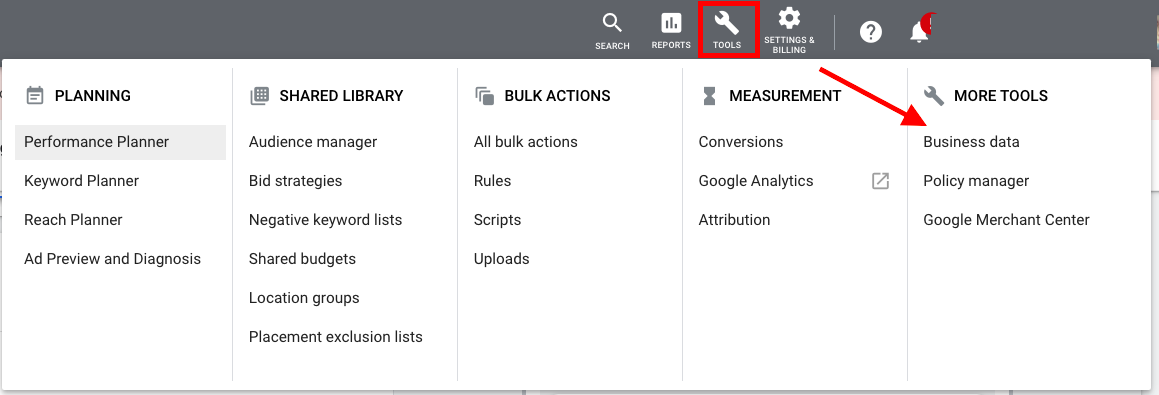 You can find “Business data” in the “More tools” section
Click the plus button and choose “Ad customizer data.”
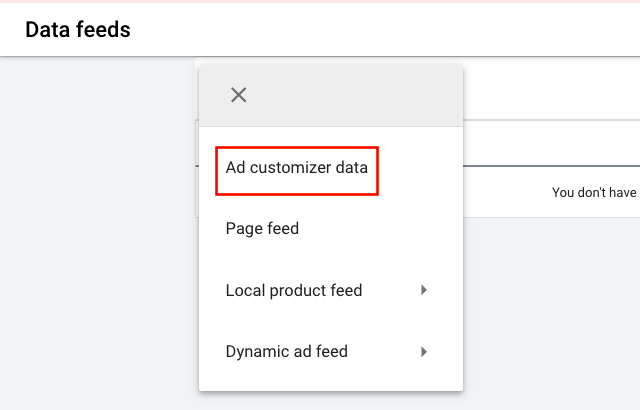 Choose Ad customizer data from a drop-down
Name your dataset. Choose your file and click “Apply.” That’s it—you’ve created a dataset for customizers.
Apply customizers to the ad texts
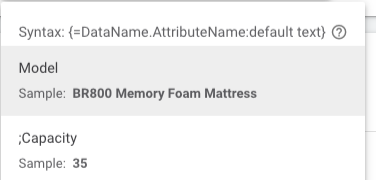
To add customizers to the ad headlines or descriptions, enter a brace ({) and, from a drop-down, select “Ad customizer.”
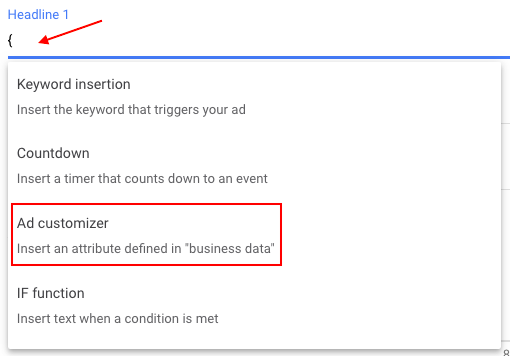 Ad customizer lets you insert an attribute defined in “Business data”
Let’s say you want the headline to display the product model and its price. To do this, after the brace, insert the “=” sign and select the name of the dataset. Select the attribute from the drop-down. In this case, you need the “Model” attribute.
After you save the ad, users will see the model name in the headline.
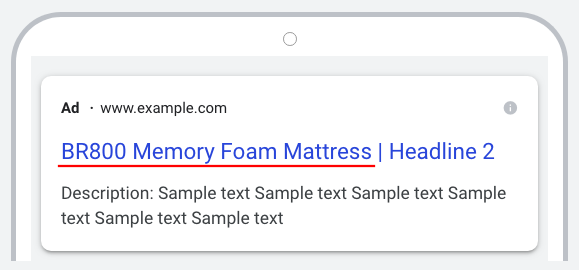 An example of an ad using a customizer
Check how the modifier works after embedding. If it displays incorrect data, check the feed. You can find how to fix errors in Google Ads Help.
Wrapping up
If you want to save time creating hundreds of ad copies for each campaign, you should try to use dynamic text. There are four tools that let you personalize your ad texts for user’s search intentions and increase CTR.
The good thing with dynamic text is that if you edit an existing ad, the previous stats will remain, so you’ll be able to compare ad performance before and after changes.
Boost your Google Ads performance! Link your PPC accounts to PromoNavi to automate everyday tasks and receive valuable recommendations on how to improve your campaigns.
With PromoNavi, you can do keyword research, competitor analysis, automate reporting, track your PPC performance on the Analytics Dashboard, and get profitable PPC optimization recommendations.


![Keyword Match Types in Google Ads [Ultimate Guide]](https://blog.promonavigator.com/wp-content/uploads/2021/04/match-types-600-360-1.jpg)