Data fetched from a survey indicates that more than 60% of consumers prefer calling businesses over the phone. Whereas the number stands at a mere 16% for emails and even lesser for other forms of communication.
These days, people don’t like to wait, especially your prospects and consumers. Literally, hundreds, if not thousands, of businesses are offering a product or service similar to yours. And your competitors are already spending thousands of dollars each month to put their business in front of the ones you’re trying to target.
So, let’s say you run a pest control agency—offering reliable pest control services in California.
If one of your prospects based in your neighborhood is in dire need of a pest control agency—what he/she will probably do is hop onto Google or Bing and type in something like:
“best pest control agency near me”
OR
“pest control services.”
Now, if you are running Google ads and are targeting similar keywords, your ad will probably be displayed in front of him/her.
So, let’s say you are running Google Standard Text Ads; here’s what your ad will look like:
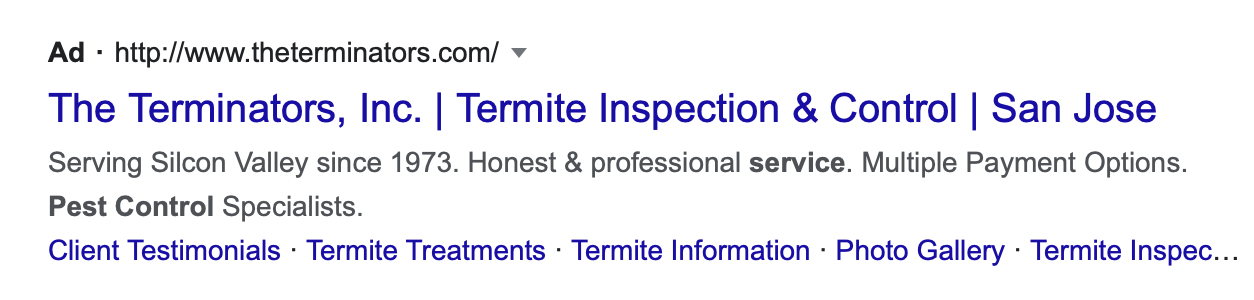
And while this ad has been crafted well, the only problem is—when your prospects click through, they’ll land on your website or your preferred destination. When they land on your website, they may explore a bit further and may even submit your contact form.
BUT! What if you could get your prospects on a call way before they land on your website? That’s right.
When it comes to certain services like pest control, locksmithing, plumbing, and many others, people are looking to connect with businesses instantly. They don’t really have the time to hop onto your website, explore it, submit your contact form and wait for your response.
No, they’re looking for instant help. And there’s no better way than to engage with your customers instantly than by letting them call you.
That’s exactly where Click-to-Call Ads come in.
To help you better understand the concept of Click-to-Call Ads and set up your first ad campaign (Google or Bing), we’ll be covering:
- What are Click-to-Call Ads?
- How to Get Started with Click-to-Call Ads on Google?
- How to Get Started with Click-to-Call Ads on Microsoft?
We’re so excited to share this with you. Without further ado, let’s dive deep into the realm of Click-to-Call straight away.
What are Click-to-Call Ads?
As the name suggests, click-to-call ads are ads that’ll get your audience on the call with you. A majority of ads (Standard Text Ads) function such that they redirect people who click on the ad to the advertiser’s website’s homepage or one of the product pages or the destination of their preference.
But that’s not the case with Click-to-Call Ads.
Rather than redirecting your audience to your homepage or service pages or a dedicated landing page, you’ll get them on a call with you – as they click on your ad.
We looked up the keyword on Google—“pest control business california” and here are the results we came across:
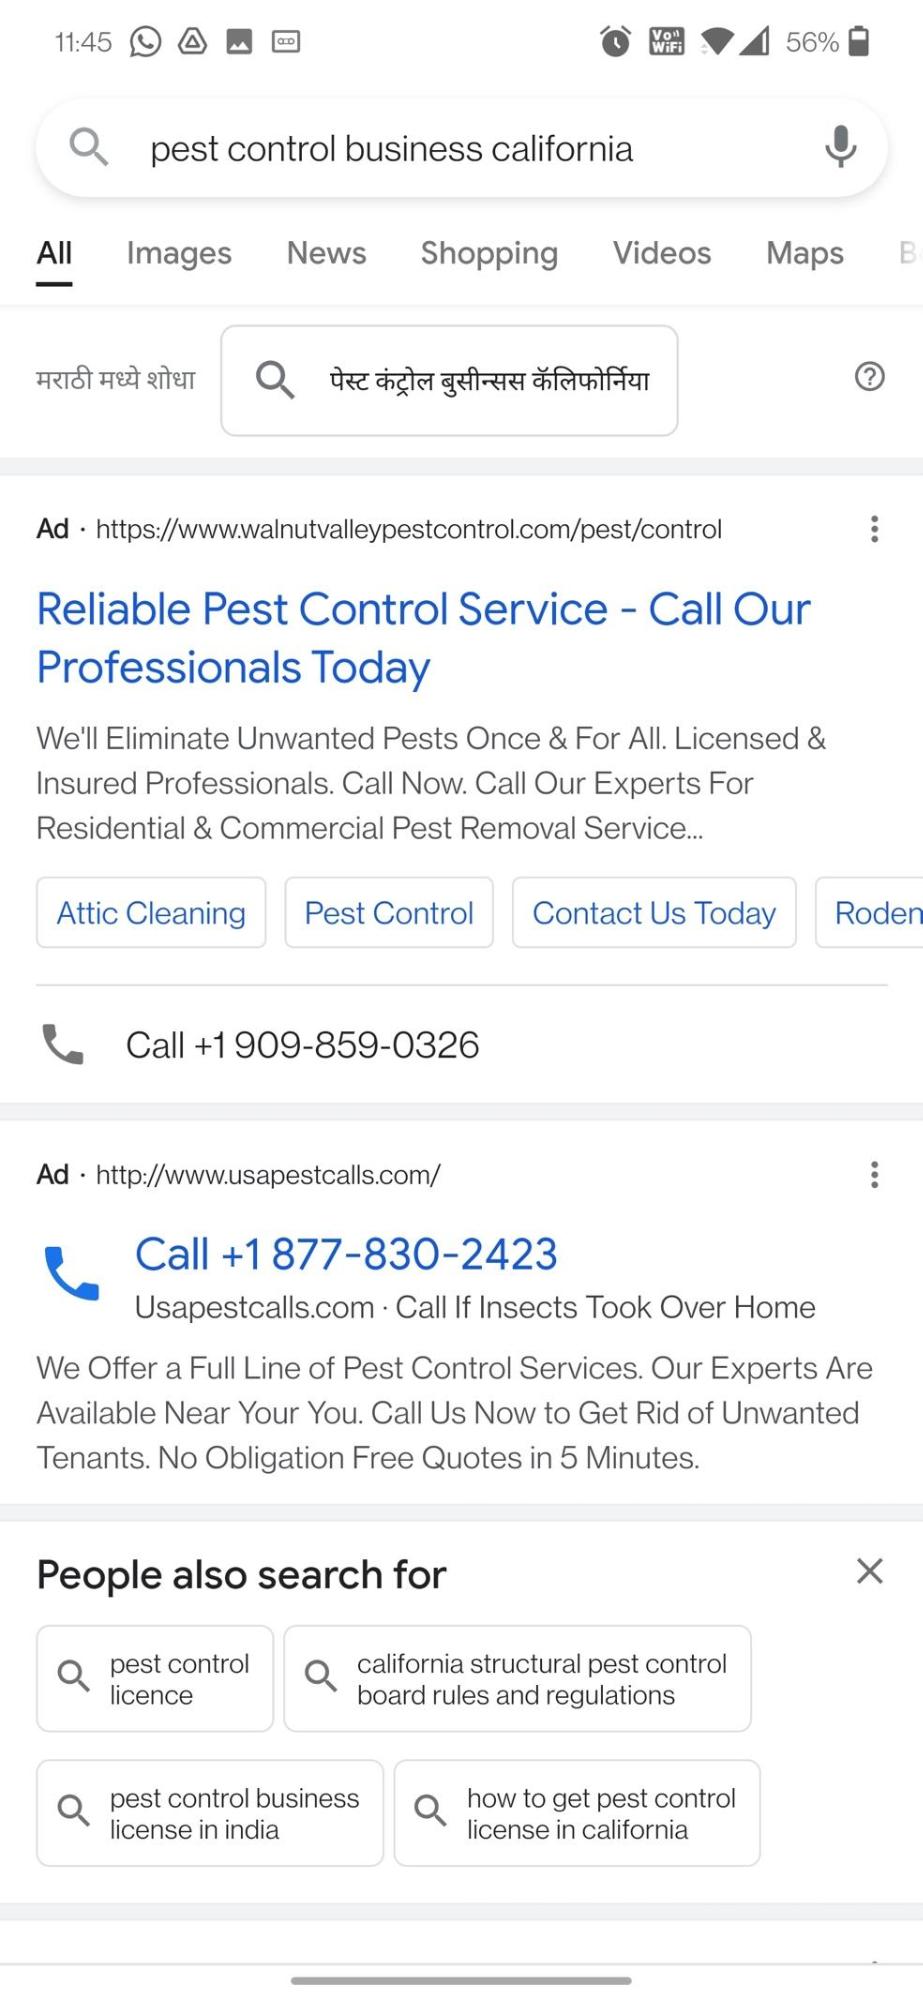
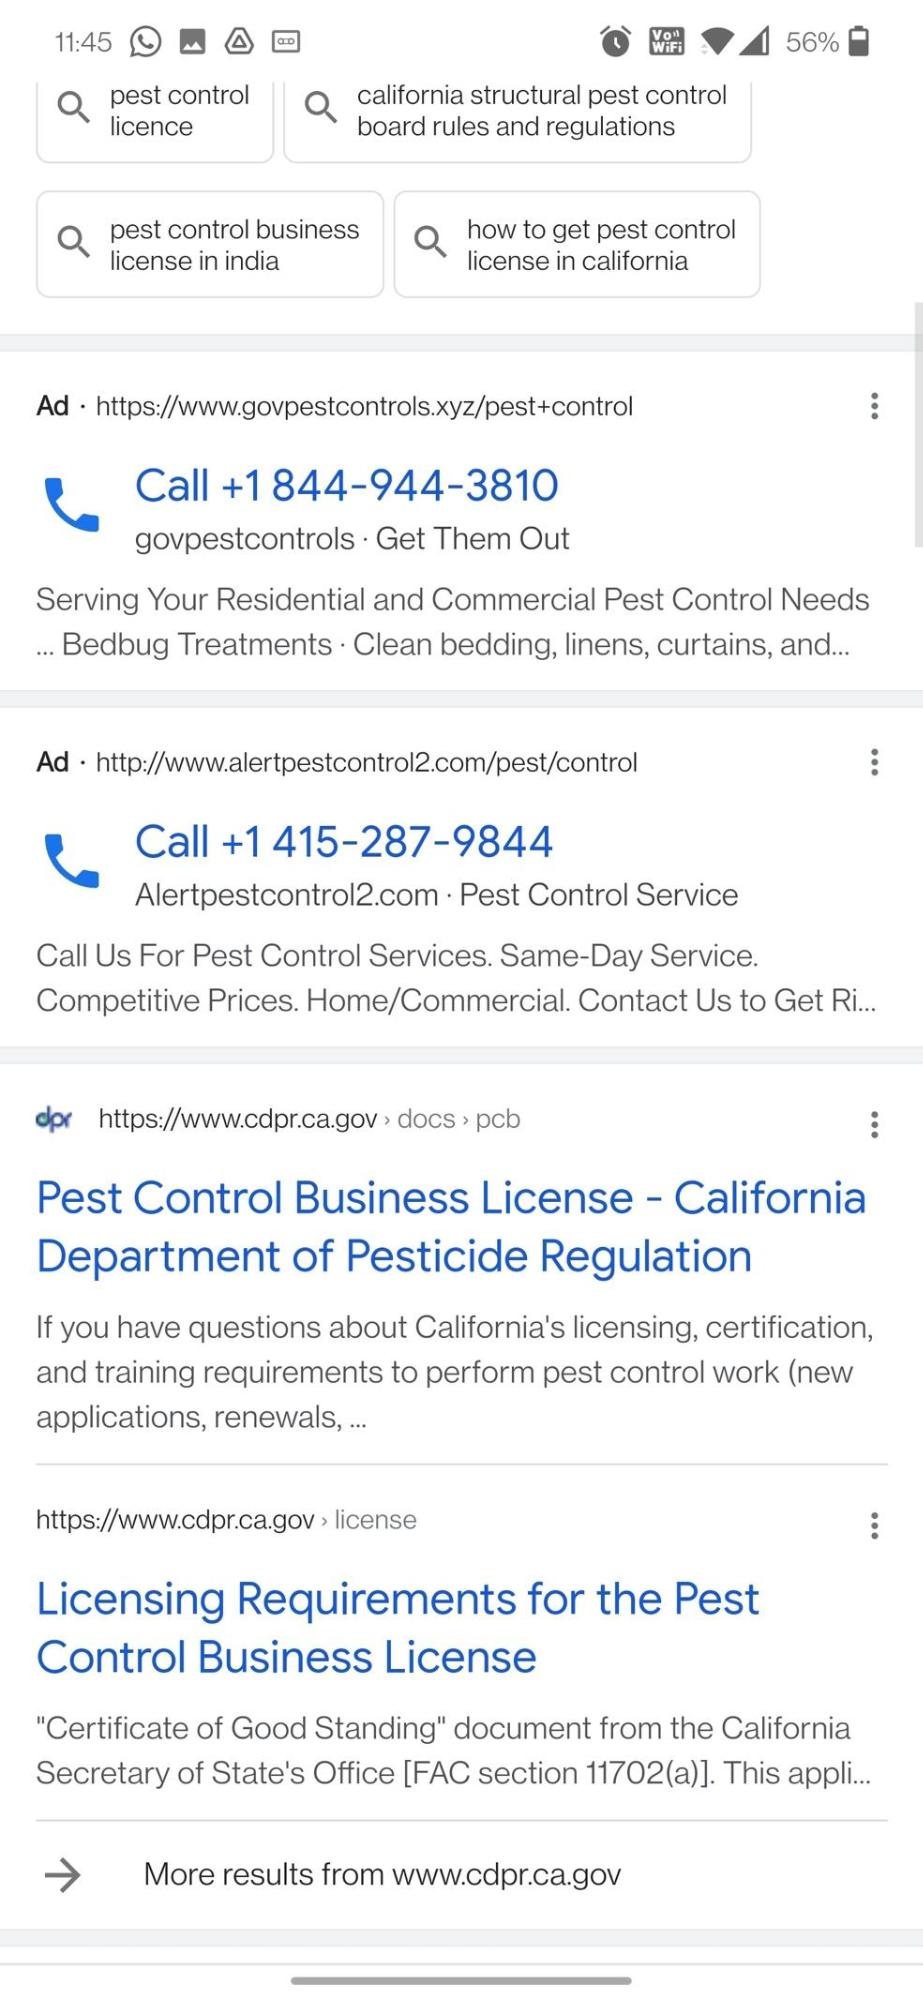
As you can see, the first one is a standard text ad The second, third, and fourth are click-to-call ads.
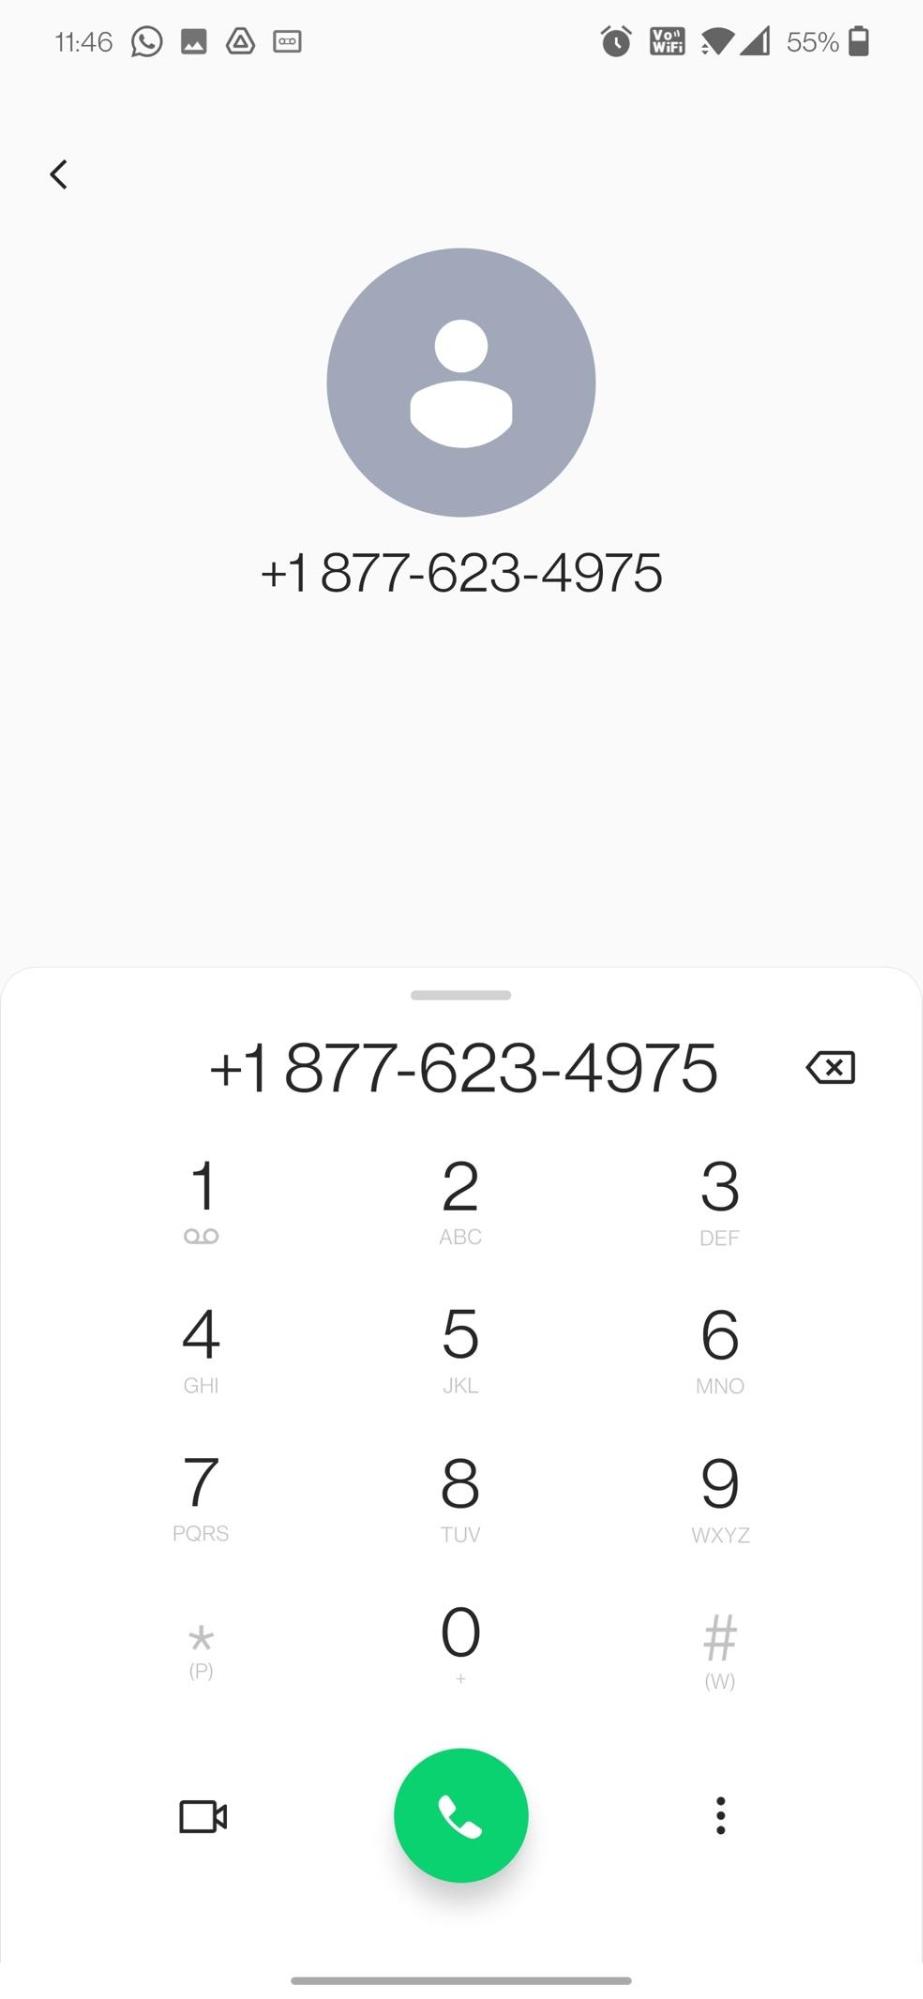
After clicking on any one of the three Click-to-Call Ads, here’s what you’ll get:

But if you click on the first ad (which is a Standard Text Ad), you’ll be redirected to the advertiser’s website page.
When it comes to click-to-call ads, you’re not only getting your prospects or customers on a call with you, but you’re also avoiding your hot prospects from turning cold.
The concept of Click-to-Call Ads sounds impressive, doesn’t it? Wait till you set up your campaign and start getting results.
Whether you’re looking forward to running your click-to-call ad campaign on Google or Microsoft (Bing), we’ve listed down the exact steps you need to follow to get your ads up and running.
How to Get Started with Click-to-Call Ads on Google
Also called Call-Only Ads, Google Click-to-Call Ads include the following information:
- Business Name
- Website URL
- Phone Number
- Description.
Setting up Google Call-Only Ads is quite easy. But since you may be doing it for the very first time, we’d love nothing more than to list down the exact steps you need to follow to get your Google Call-Only Ads campaign up and running.
- Head to Google Ads Dashboard
- Select “Search Campaigns” in the Left-Hand Navigation Bar
- Under Ads & Extensions, Select “Ads”
- Select “Call ad”
- Select Your Campaign & Ad Group
- Fill in the Required Information
- Turn On “Call Reporting” If You’re Looking Forward to Collecting the Performance of the Ads
To set up a “Calls Only” ad campaign in Google ads, you need to make sure that you already have an active search campaign. Otherwise, you’ll be unable to create the ad.
Go to Google Ads dashboard
To set up your Google Calls-Only ad campaign, the first step is to head over to your Google Ads dashboard. Click HERE to head over to Google Ads and log in with your Ads account if you haven’t already.
Select “Search Campaigns” in the left-hand navigation bar
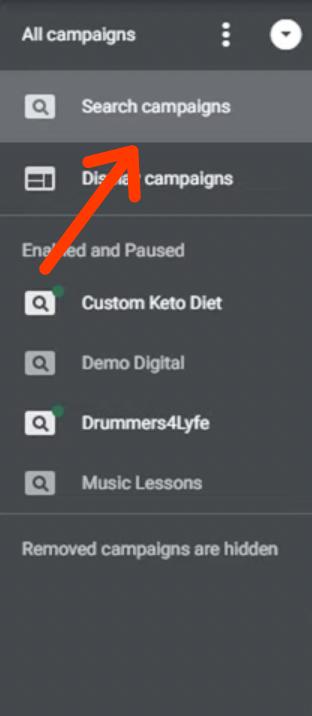
In the left-hand navigation bar, click on “Search Campaigns” which you’ll find under “All Campaigns.”
Under ads & extensions, select “ads”
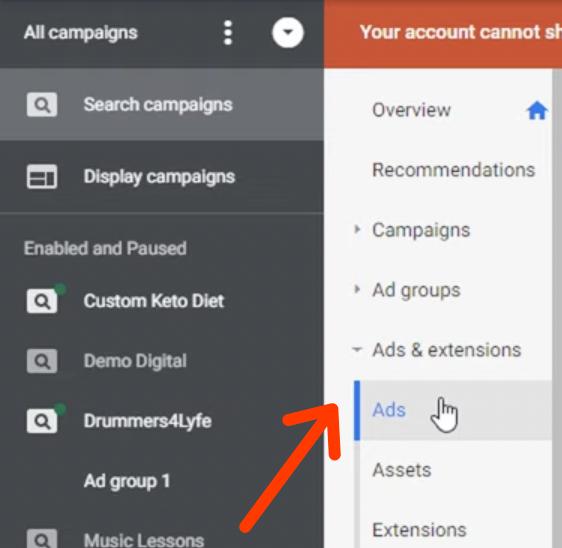
Now, when you select “Search Campaigns,” you will see a window with different options like:
Under Ads & Extensions, select “Ads.”
Select “Call ad”
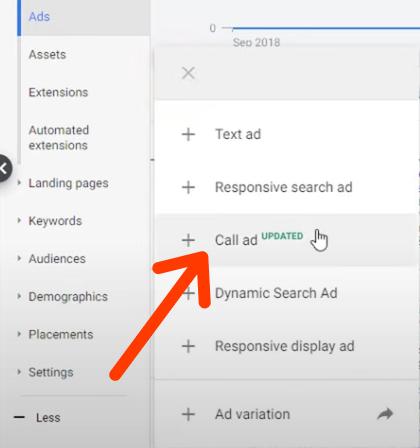
Upon clicking on “Ads,” you’ll see all the ads you have up and running. To create a new Calls Only ad, select the “+” button. As you select it, you’ll see a window popping over it with the following options:
- Text ad
- Responsive search ad
- Call ad
- Dynamic search Ad
- Responsive display ad
- Ad variation
Select “Call ad” to set up your Calls-Only Ad.
Select your campaign & ad group

Now, remember when we told you that in order to create a Calls-Only ad, you need an active search campaign and ad group. Well, now Google Ads will ask you to choose the search campaign and ad group via the “Select an ad group” pop-up.
First, select your campaign.
And when you do, select the respective ad group.
Fill in the required information
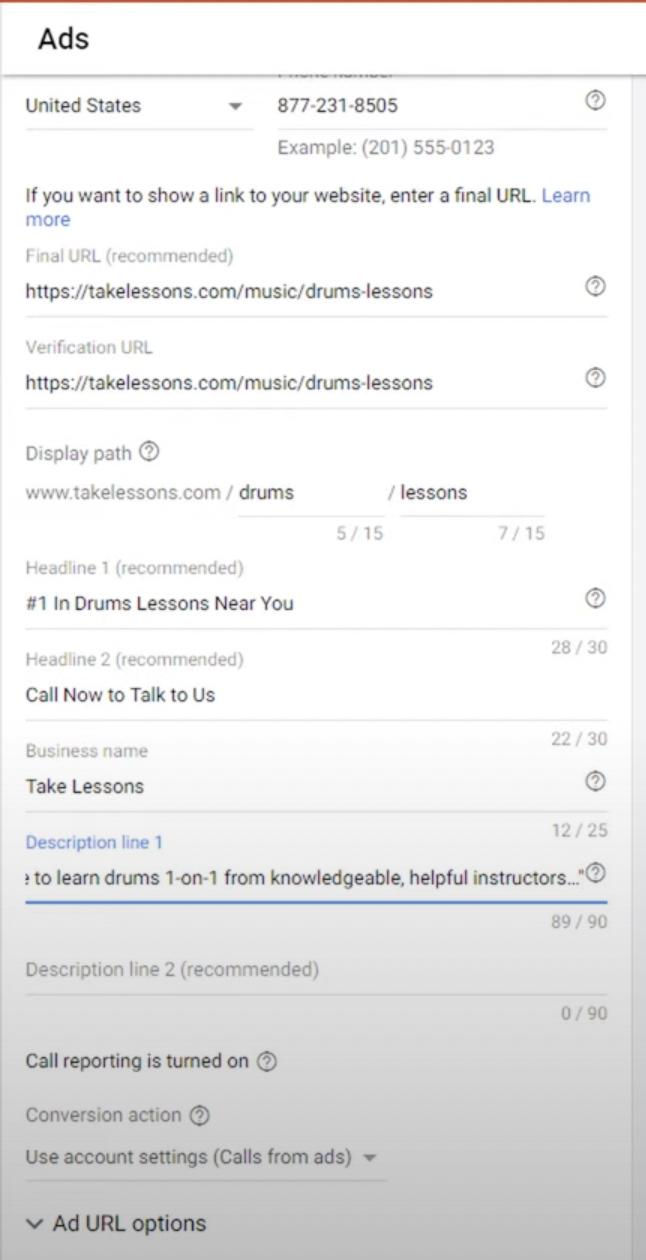
You’ll be asked to create a new call ad. Fill in the required information, which includes:
- Phone Number
- Final URL
- Verification URL
- Display Path
- Headline I
- Headline II
- Business Name
- Description Line I
- Description Line II
Turn on “Call Reporting” if you’re looking forward to collecting the performance data
If you want to collect the performance of your Calls-Only ads, turn on Call-Reporting which you’ll find below Description Line 2.
Save the ad
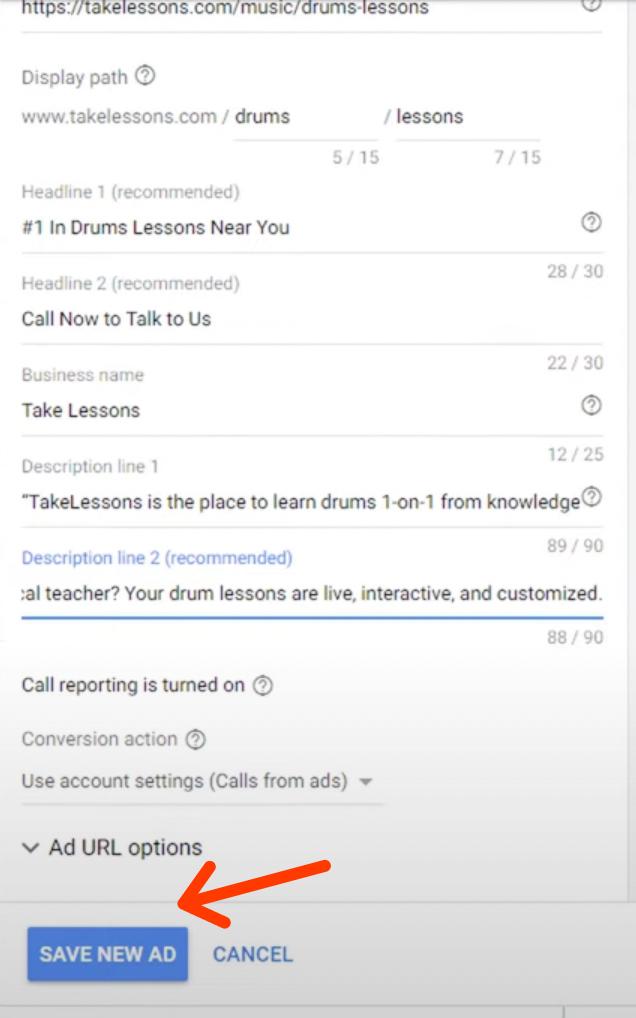
Once you have built your ad, it’s time to save it. You can do it by clicking on “SAVE NEW AD.”
Now, Google will review your Calls-Only ad, and if everything’s right, your ad will be approved and up and running in no time.
Congratulations! You have successfully set up your first Calls-Only Ad campaign. Now, you can start receiving calls from your prospects and customers looking forward to purchasing your products or services.
If you want to set up Click-to-Call ads on Bing, keep reading as we’ll show you how you can set up your first Click-to-Call ad campaign on Bing.
How to Get Started with Click-to-Call Ads on Microsoft
Follow these exact steps to set up and launch your first click-to-call ad on Bing:
- Head Over to Microsoft Ads Dashboard
- Create a New Campaign by Selecting “Create Campaign”
- Choose the Goal of the Campaign
- Create a Campaign
- Create Ad Group and Enter Keywords
- Add Call Extension
- Create Your Ad
- Set Your Campaign Budget, Bid Strategy & Ad Group Bid
- Save Your Campaign
Head to Microsoft Ads dashboard
To set up your Microsoft Calls-Only ad campaign, the first step is to head over to your Microsoft Ads dashboard. Or you can just click HERE to go to Microsoft Ads and log in with your Ads account if you haven’t already.
Create a new campaign
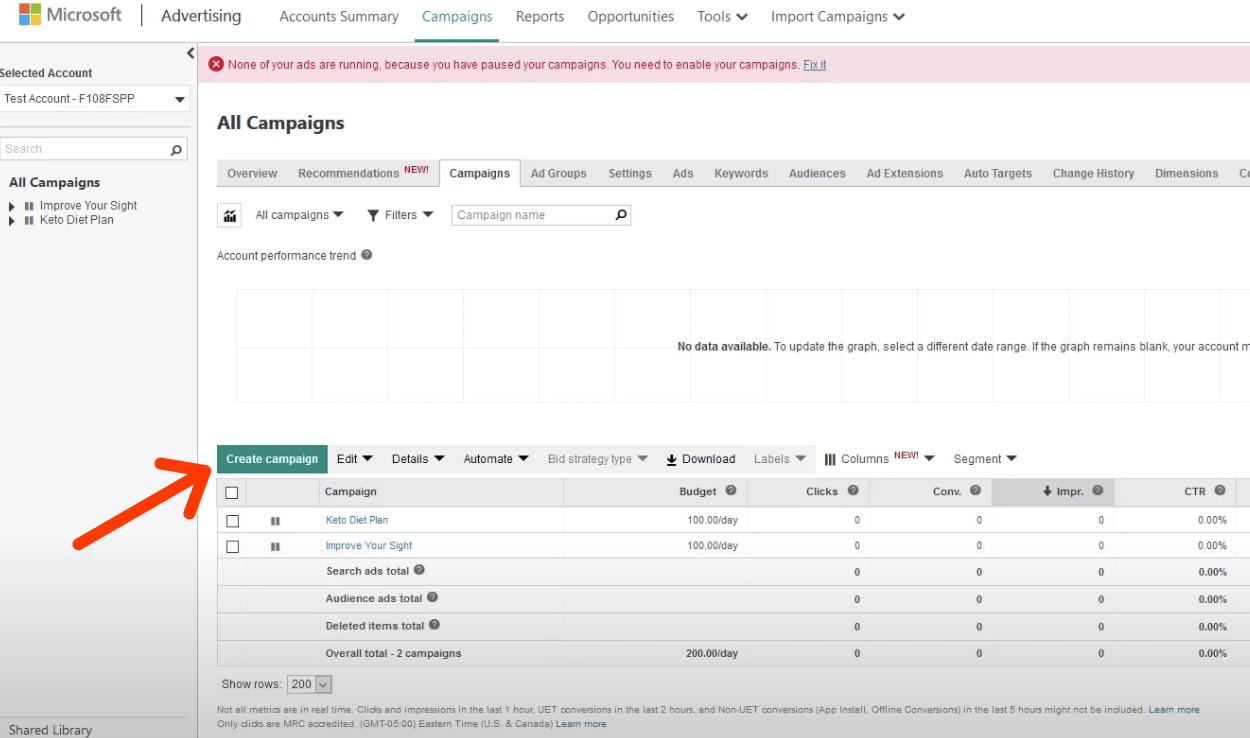
Before we create our Calls-Only ad, we’ll create a new campaign. You can do this by selecting “Create Campaign” under “Campaigns” in the Microsoft ads dashboard.
Choose the Goal
As you select “Create Campaign,” you’ll be redirected to a new page where you’ll be asked to select the goal of the campaign.
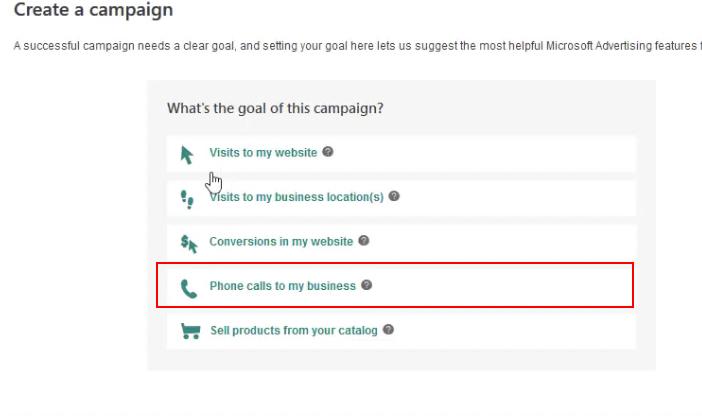
Here, since we want our prospects to directly call our business, we’ll select “Phone calls to my business.”
Set up a campaign
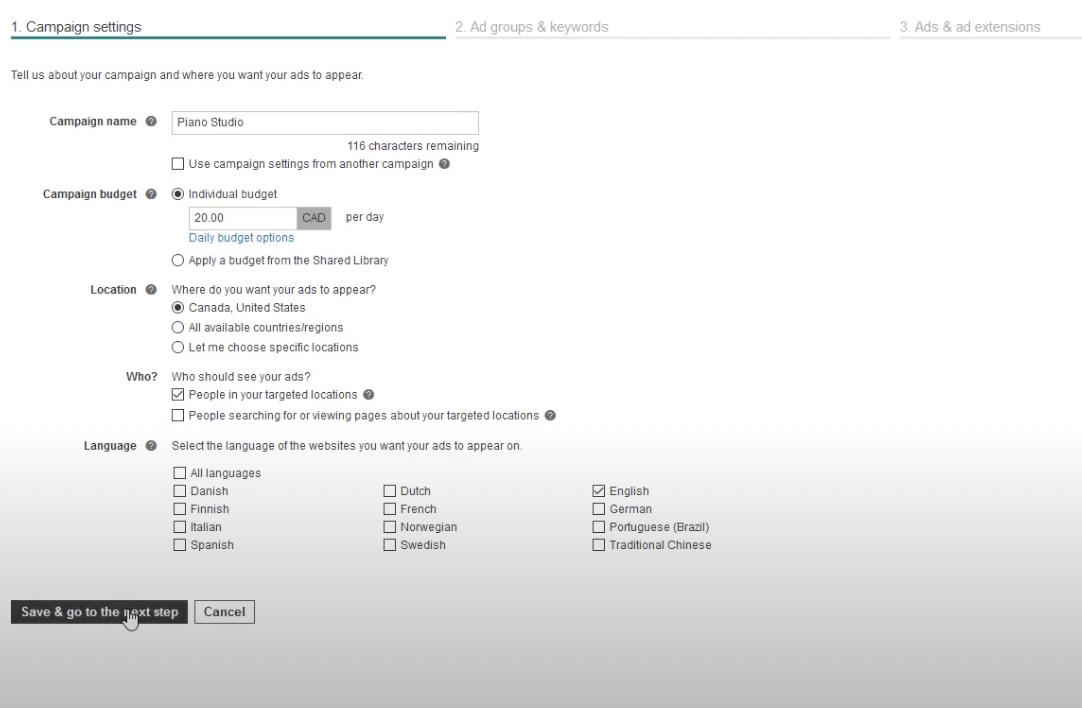
Add the following information:
- Campaign Name
- Campaign Budget
- Location
- Who You’d Like to See Your Ads?
- Language
Upon selecting this information, select “Save & go to the next step.”
Create ad group and enter keywords
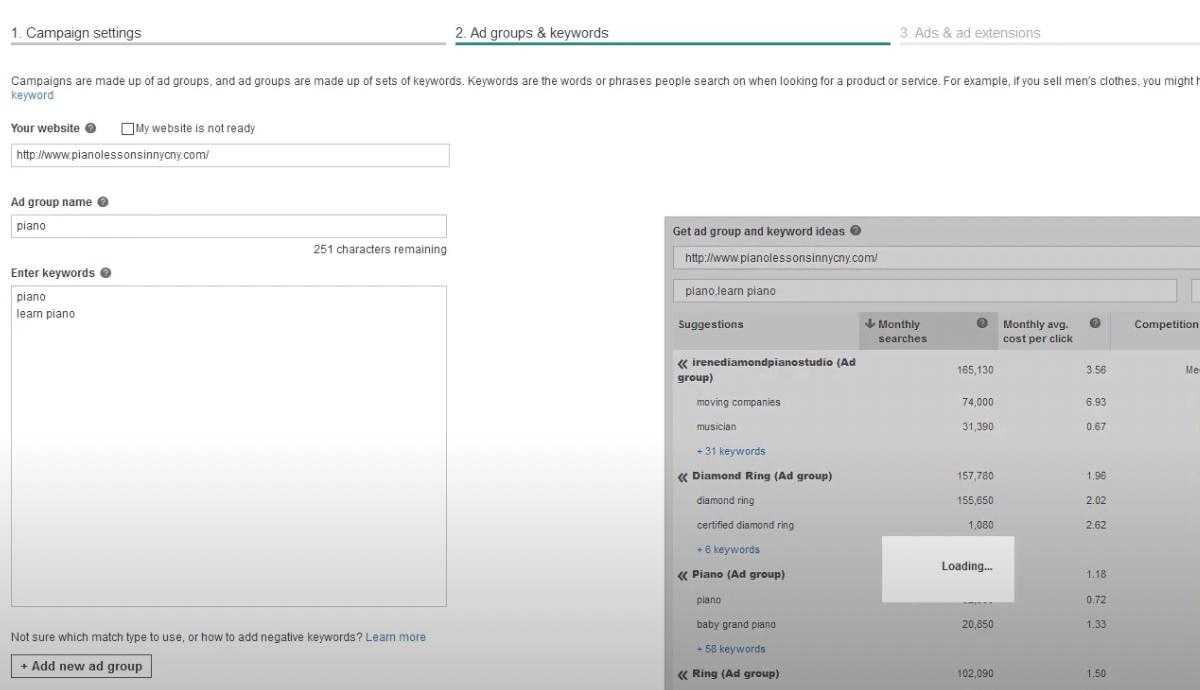
Once you have created a campaign, the next step is to create your ad group. Here, you need to add:
- Ad group name
- Enter keywords you’d like to target.
When you’re done filling in this information, select “Save & go to the next step.”
Add call extension
Now, you’ll be redirected to the “Ads & ad extensions” section, where you can start creating your ad.
But before you start doing that, you should add a call extension.
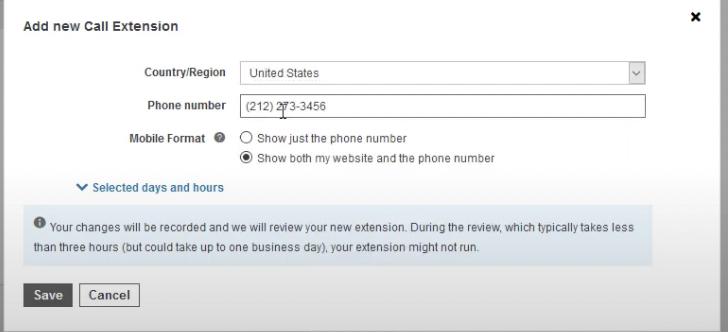
Under “Ads & ad extensions,” in the “Call Extensions” section, click on “+ Add new Call Extension.”
As you do, a new pop-up will open where you can add a new call extension.
Select your:
- Country/Region
- Phone Number
- Call Tracking
- Mobile Format
- If Needed, You Can Add Selected Hours Under the “Selected days and hours” section
As you add the information, click on “Save.”
Now, it’s time to create the Calls-Only ad.
Create your ad
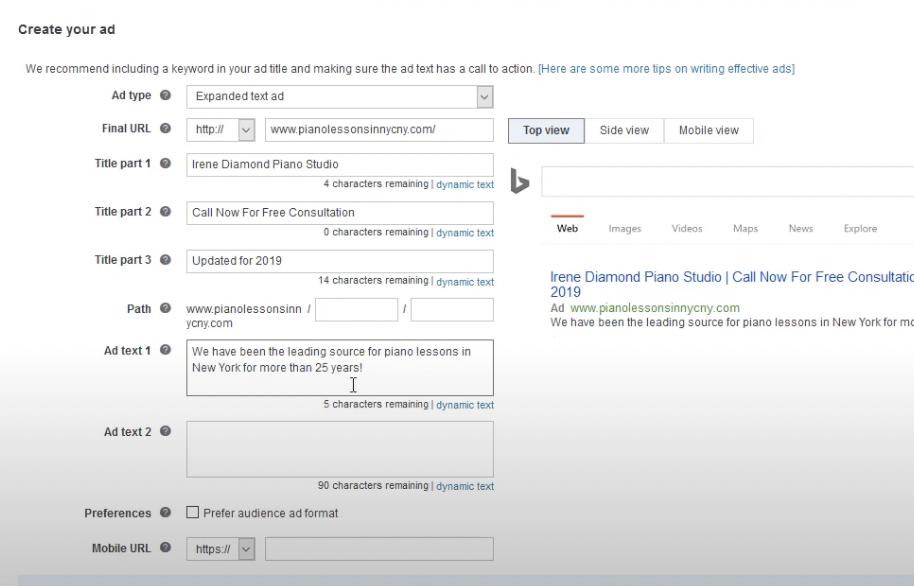
You’ll be asked to fill in the following information:
- Ad Type—Select Expanded Text ad
- Final URL
- Title Part I
- Title Part II
- Title Part III
- Path
- Ad Text I
- Ad Text II
- Preferences
- Mobile URL
As you start filling in the information, you can see what your ad looks like on the right. You can have a look at the Top view, Side view, and Mobile view.
When you’re done, click on “Save” at the bottom, and you’ll be redirected to the “Budgets & bids” section.
Extensions in Google Ads and Microsoft (ex-Bing) Advertising
Set your campaign budget, bid strategy & sd group bid
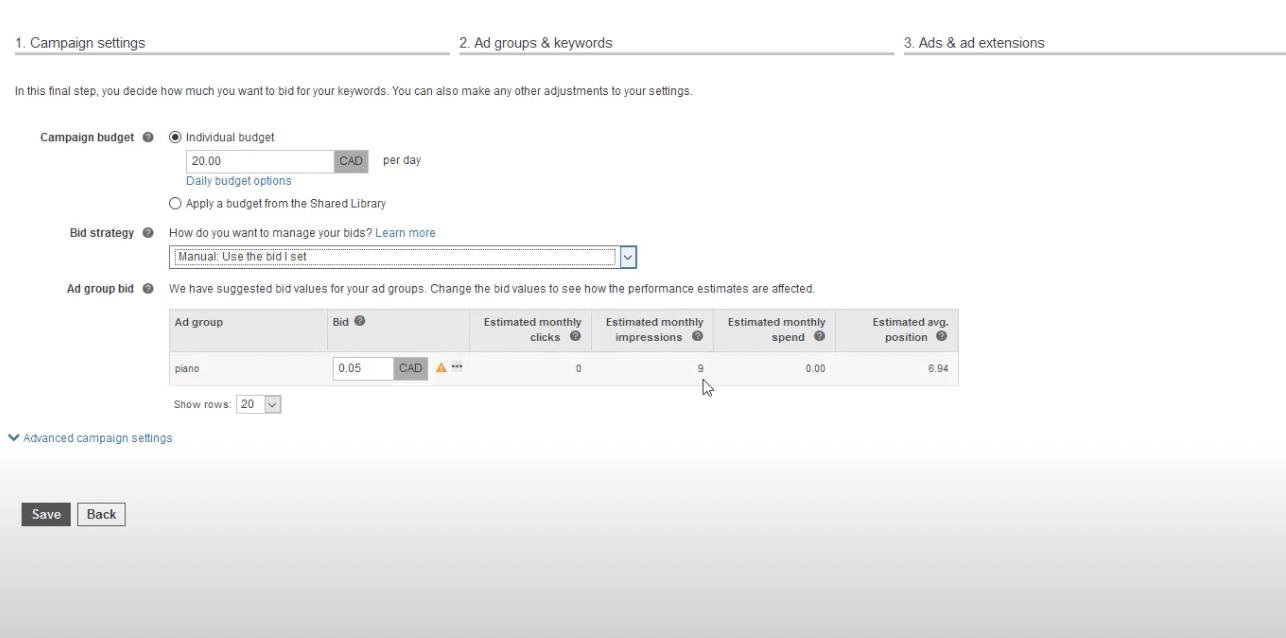
Now, under “Budget & bids,” you need to select:
- Campaign budget
- Bid strategy
- Ad group bid
Finally, hit the “Save” button. And you’re done.
That’s how you can get your Calls-Only or Click-to-Call ads up and running.
Congrats! Be ready to receive dozens of calls from your prospects and customers.
Conclusion
Click-to-Call ad type is one of the most popular Google and Microsoft ad types among advertisers and has helped thousands, if not millions, of businesses worldwide receive calls from their audience.
And if your aim is to get your audience on the phone and haven’t set up a Calls-Only ad, you’re missing out on a lot.
To get even more from your Google and Microsoft ads, link your advertising accounts to PromoNavi to boost your ad performance!